Peak To Peak Painting Durango

The Dangers of Snow Around Your Home

We have been blessed with snow in Durango this Winter.  Well, depending on how you look at it!  To date, we have about 2 feet more than last year in the high country (https://goo.gl/pV5Hd8).  We are not complaining, but I do want warn you about the hurdles that accompany heavy snowfall.  Snow removal is commonplace in Colorado, but spend an extra ten to twenty minutes going above and beyond and you will save yourself some headaches when the snow melts.

The Dangers of Snow

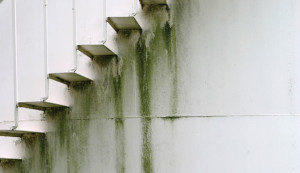
Clear Snow Near Walls of House

I know clearing snow is all you do when you get home from work, but if it’s practical, try to shovel it away from your home’s siding.  Not only can long term exposure to wet snow ruin stucco or wood siding, but it can melt and get under your home’s foundation.  If you’re not too worried about your home’s exterior, think about the interior paint, woodwork, trim, etc. that’s nearby.  I know it doesn’t seem plausible, but when snow melts it often drips into new cracks and refreezes at night.  This causes problems in your home’s foundation and other nooks and crannies inside your home.  So be sure to clear at least a foot between your snow piles and your home to keep damage at a minimum.
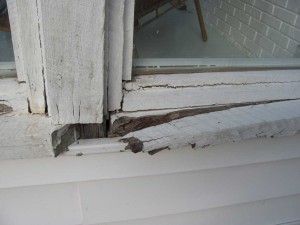
Keep Snow Off Roof

Whether you use a roof rake or a shovel, keep that snow from piling up!  Not only are you risking your roof caving in, you run the risk of ice damming.  Both problems are way more common than you think.  The former is less common, but you’d be surprised with a winter we’ve been having.  For those of you who are less familiar, ice damming occurs when snow melts and refreezes.  This often shifts ice up and into cracks that leads into your home.  Some of us are lucky enough to have heat cables installed or a roof with a high pitch.  Some of us are stuck with the design flaws because fixing the pitch in a roof is pricey!  So as tempting as it may be to let that snow pile up and take care of it on the weekend, it’s best to take it down once it’s surpassed a couple inches.

Call for Help

Do not be afraid to call in a professional.  Our team has the equipment and experience to prevent issues like the one’s described above.  And let’s be honest, sometimes you just need a break from all the snow shoveling, so let us do it for you!  If you know your home’s exterior or interior walls could use a repair, we can help with that, too!

If snow removal becomes too daunting a task to take on, let us do it for you.  Call anytime at (970) 903-4305. We work in the Durango area and can help with almost any home improvement project.

Tips for Painting Your Kitchen Cabinets

It is super trendy to repaint kitchen cabinets instead of completely replacing them.  And while I love when people can reuse what they already have, I know how incredibly frustrating and tempting it can be to give up the effort and just buy new.  Here are is some advice so you can be successful.

LABEL, LABEL, LABEL

When you begin removing doors off their hinges, put those hinges and other hardware in labeled containers or plastic baggies.  To make life easier, you can even leave those containers inside the cabinets they correspond to.  Don’t forget to put a piece of masking tape on the back of the doors, because once you take those babies outside, you will be putting together a master puzzle without labels to guide you.

CLEAN AND SAND, THEN SAND AGAIN

You would be surprised how much dirt and grease kitchen cabinets can collect over the years.  Invest in a good degreaser and give your cabinets a good washing.  Once dry, follow up with a good sanding using a medium grit (150 grit or so) sandpaper.  Sanding is non-negotiable as it allows the paint to adhere to the cabinets.  Do not take this lightly!

DUST AND DEBRIS

I can’t tell you how frustrating it is to spend so much time prepping a cabinet for paint only to begin painting over forgotten dust.  Seemingly small, dust can ruin the smooth appearance of paint.  If you want to avoid making a mosquito a permanent fixture in your kitchen, I highly recommend choosing a safe place like a well-ventilated garage or a covered porch on a clear day to allow your cabinets to be painted and dry.

PRIMER AND PREMIUM PAINT

So many people think this step is optional!  If you are working with wood cabinets, it’s common for knots in the wood to begin appearing as the paint dries.  Save yourself the agony and just apply some primer.  The paint will not only look nicer, but it will last longer!

Buying a high-quality paint that stands up to scrubbing, steam, grease, heat, etc. will also save you heartache.  You will see less chipping and a smoother finish.

COVER BRUSH STROKE WITH A ROLLER

Most professionals prefer the look a paint sprayer offers, but if you choose to go this alone and use a brush, smooth brush strokes by lightly rolling over paint with a foam roller.

AMPLE DRYING TIME

You may be in a rush to re-hang cabinet doors and drawers, but slow your roll.  A temporarily disheveled kitchen is a small price to pay for flawless cabinets.  Allow a few days for paint to cure or risk paint smudges and finger prints!

And as always, if you get in too deep or decide you don’t want to get involved at all, give us a call at (970) 903-4305. and we will do it for you!  We work in the Durango area and love a good challenge.  This article was in large part inspired by .

Interior Painting Ideas for a Rainy Day

If you are one of those weird “productive” people, you will be excited about this!  Even a rainy day can’t stop you from home improvement projects.  Some of these projects are a half days’ worth of work, but most can be finished in under two hours.  Best part is, it doesn’t even have to be rainy outside

interior painting ideas
Image Credit: House & Home

Freshen up Trim

Trim and crown molding are easily the most overlooked furnishings in our homes, but they need love too!  Most people typically stick to white, but you don’t have to!  Picking a contrasting color for your crown molding or baseboard can really be attractive!

Interior Painting Ideas
Image Credit: Apartment Therapy

Paint a Small Space

The bathroom is just one idea.  You can simply paint just the bathroom vanity if you want.  It is still considered productive if you just give the inside of bathroom vanity drawers a fresh coat of color!  Try picking vibrant colors for your vanity/vanity drawers.  You can also add a new color to your laundry room or if that’s too daunting, spray paint an old wicker laundry basket!

Bathroom painting ideas
Image Credit: Apartment Therapy

Revamp Table Lamp

If you have an old lamp that you’re close to throwing away, consider giving it a second chance at life with a bold color.  You’d be surprised how much more you’ll love it.  Or if you’re really feeling squirrely, paint the table it sits on top of, too!

Interior Painting Ideas
Image Credit: Wayfair

Add an Accent Wall

Accent walls are still in style!  Just do not overdo it and give every other wall an accent.  Most of the time it’s best to pick just one wall per room.  Also be sure to pick the wall you want to emphasize and choose the appropriate color.  Most experts will tell you to choose a shade bolder than existing wall colors.  Read up on what colors complement each other or ask a professional at the paint store if you’re unsure of a “bolder” color.

Refresh an Old Dresser

If you scored a free dresser from someone’s curb or at a garage sale, scuff sand it and paint all one color.  If you have several colors, try painting the drawers and base different colors.  Or tape it off and give it a funky design.  For more advice on the subject, read here.

paint old furniture
Image credit: Apartment Therapy

Revamp Old Curtain Rods

Instead of investing hundreds of dollars in new curtain rods, add a coat of white paint or another color that suits you.  You will be surprised how it changes your window’s whole look!

Modernize an Old Chandelier

Breathe new life into an old chandelier by – you guessed it – giving it a new coat of white paint.

Update Door and Drawer Hardware

Using a spray paint designed to adhere to metal, remove dated hardware around your home and give it a fresh coat of black paint.  $5 and an hour of your time is a whole lot more attractive than easily a couple hundred dollars for new hardware.

Add a Splash of Color to a Column, Staircase Railing, etc.

If you have a unique feature in your home such as a column or spiral staircase, paint it a contrasting color from the rest of your home to really showcase it.

Interior painting ideas
Image Credit: HGTV

If a Do-It-Yourself project is not in your nature or you just don’t want to do this on your own, give us a call.  We love people and we love painting! We are located in the Durango area and can be reached 24/7 at (970) 903-4305.

Article sources: Apartment Therapy and HGTV.

How to Repaint Furniture Like a Pro Painter

You have heard it before – a few coats of paint make a world of difference!  But have you ever applied this to your drab furniture?  Are you sick of looking at your lackluster dresser that has been the same color ever since the day it left your childhood bedroom?  Is your front porch swing getting a little too much sun and fading fast?  A fresh coat of paint can have you admiring your furniture again!

This is advice mostly applies to wood furniture, but for a lot of other materials, you can apply the same steps.  Be sure to take your furniture outside or to a well-ventilated area before anything else!  If you take your furniture outside to paint, be sure it’s not too windy, rainy or cold.  These conditions can leave debris in your finished product, create bubbles, etc.

Repaint furniture like a pro painter
Photo by: brynalexandra.blogspot.com

What You’ll Need:

  • Sandpaper (or an orbital sander if you’re impatient)
  • Tack cloth/duster
  • Primer
  • Spray Paint
  • Sealer
  • Optional: Mask, Masking Tape, Painter’s Plastic

Sanding & Prep

We do more sanding than anyone we know, but if you want to make your life easier use an orbital sander with 80 grit sandpaper to remove existing paint/lacquer.  If you’re on budget or incredibly patient, use sandpaper and buckle down.  Once you’ve removed existing paint, switch to higher grit to create a smooth finish.

If there is a piece of your furniture that you do not want painted or you want painted a different color, consider using painter’s plastic and tape off the area after a good dusting.

orbital sander
Photo by Aliexpress.com

Prime It

Before you prime, be sure to remove any sanding dust you created with a tack cloth.  Like sanding, you don’t often see an instant improvement to your project by using primer, but trust me, it’s crucial to the success of this job!  It will help the new paint stick better.  Using a tinted primer may be your best bet if you are painting with a darker color.  When applying spray paint, do not spray too closely.  Maintain a distance of at least 6 inches.  When spraying the primer, use long, even strokes.  You are going to apply multiple coats so if you do not cover a tricky spot as well as you wanted, resist the urge to lay it on thick.  When you apply extra paint to one spot without allowing the first layer to dry, you are more likely to get bubbles and drips.  Once you let the first coat completely dry, apply a second.  If you’re extra ambitious, a third coat will make your piece that much more durable.  And if you really love your life, you can pick up that sandpaper again and sand between coats of primer!

Paint It

Now that your primer has completely dried, it is time for the fun stuff!  Using your spray paint at a distance of 6 inches or so, apply long, even passes of paint.  Allow ample time to dry and apply a second coat, then repeat for a third coat.

Seal It

If your piece of furniture gets a lot of traffic, sealing it with a clear coat may be a wise decision.  A clear coat is not a necessary step to a good looking finished product, but it will make your piece all the more durable.  Truthfully, it’s really not that much more work!  Just be sure to allow ample time for the spray paint to dry before applying a sealer.  And if you see any rough spots, don’t be afraid to sand them and paint again if necessary.

And if the Do-It-Yourself route is not your cup of tea, call us!  We’ll make quick work of any exterior or interior paint project you may have!  You can reach us in Durango at (970) 903-4305.

The Ultimate Cheat Sheet on Pairing Paint Colors

Given that there are thousands of paint colors to choose from and at least a dozen walls in every home, it can feel like a challenge fit for an expert designer to pick paints colors that you love AND that love each other. Sometimes it just seems easier to paint everything one color, but choosing different colors can accentuate beautiful features of your home, make rooms more spacious and create an unforgettable atmosphere.

The ultimate cheatsheet for pairing paint


You want all those things, but not at the price of hiring an interior designer. Sure, most painters can help you put up a paint color you choose, but not many will give you great advice on how to pick other colors to suit your style, vision or existing design elements. Fortunately for those of you in Durango, we can help with all those things! For those of you who don’t have that luxury, please read on:

Find the Focal Point

The focal point of your room could be anything from a rug to a small picture on the wall. Find what you like most about that room and try to find colors that blend with it. You do not need to match it exactly. Most designers try to find colors that blend well with furnishings or flooring. Start there.

Determine Your Goal

Are you trying to make the room feel cozier? Larger? Cool, light colors will help you make your tiny bathroom feel airier. Warm, rich colors will achieve the opposite – a cozy, more closed-in room.

General Rules of Thumb

You want your house to flow from room to room so it makes sense to pick colors that will help you accomplish that. A big short cut is to vary the intensity of a color in a nearby room ever so slightly. If you are redoing the interior paint scheme of your house, your safest bet when balancing paint colors is to pair warm colors with warm colors and cool colors with cool colors. Also known as analogous colors. This logic does not hold true for styles where you really want have colors pop. We’ll cover this later. This is advice is to help you pick colors that look good together, but also to help you avoid colors that clash. If you look at a color wheel, the cool colors are more greens and blues and your warm colors are predominantly reds and oranges.

color wheel

Risk Takers and Rule Breakers

You know who you are! Some of you cannot help but want to go against the tide (I’m with you!). If your personality is more eclectic, you may really like pairing complimentary colors. When I say “complimentary,” I’m referring to the textbook definition of complimentary colors: colors opposite each other on the color spectrum. As the saying goes – opposites really do attract! To make this easier, look at a color wheel. Whatever is directly across the color wheel from your chosen color is a color that will complement that other color well.

Neutrals Never Hurt

Seriously though, that is the beauty of neutrals. These are the colors that are absent from the color wheel – your whites, browns and blacks. They blend well with just about any décor and they are universally likeable. If you are trying to resell your home, redoing the interior paint in your home in neutral colors will help potential buyers visualize their décor in your home.

Pairing Paint Colors with Wood Details

If you have a house filled with wood details, white is a great choice to pair with it. Stay away from stark whites and stick to the milkier colors. Medium toned woods like walnut look best with light grays and blues. Darker woods pair well with gray and brown. If you like the “Santa Fe” feel, try rusts and burnt oranges with almost any of your wood details.

In the End…

Everyone has their own sense of style and some of the brightest designers will contradict this logic and come up with the most beautiful room you’ve ever seen – so don’t take this as gospel. This is meant to be a cheat sheet for those of you looking to skip design school. And again, if you live near Durango, lean on us for help! We have a lot of experience pairing colors and keeping people happy!  Call us at (970) 903-4305.


Signs It’s Time To Repaint The Exterior of Your Home 

If you are reading this article, chances are you may be doubting whether it is time to repaint the exterior of your home.  As painters, we often see homes where owners waited too long to call for help and ended up needing new drywall, siding or wood in addition to new paint.  If you even have the smallest doubt, call someone a free estimate.  In Durango, our homes are at higher risk because they are exposed to harsh snow and sun all winter, and then take a beating in the summer from the monsoons, wind and hot sun.  If you are not too concerned with the exterior of your home needing new paint, be sure to take a look at you’re the inside of your home as these signs hold true for interior paint as well!  Here are some telling signs that it is time to repaint your home:

Chipping, Flaking, Peeling

This list also includes alligatoring, blistering, and mud cracking.  This is essentially  boils down to paint not adhering well and allowing air bubbles in underneath.  If age is not the culprit, he surface was more than likely not prepared very well.

Spider Cracks

Humidity, temperature and air pressure changes cause your substrate and paint to expand and contract.  And because they are made of different materials, they expand and contract and different rates which can cause these spider cracks.  A painter will spend time sanding, washing, priming, repainting and protecting your home’s exterior to prevent issues like this from reoccurring in the future.

spider cracks

Water Stains

Mold and mildew stains are the bane of my existence.  Again if you live in Colorado, water exposure is inevitable.  This is why it is important to talk to professional to ensure the water is not perpetually leaking and to prevent the water from seeping through in the future.

water stains

Color Fading

This one is less obvious to some.  It does not take a trained eye though to see a color has been altered due to sun or age.  If the color looks a little “off” or less uniform with other parts of your house, you should ask a painter what can be done to extend the life of your paint moving forward.

Interior and Exterior Walls Look Dirty

If you spend a lot of time scrubbing and power washing your home’s exterior and it does not appear to be getting any cleaner, it’s more than likely the paint is past its prime.

Color Is No Longer Modern

You know who you are!  If you thought it could use an update at any point in time, it’s time!  And who knows, you may even be able to get away with just redoing trim or repainting a side that is most exposed to the sun.

Wood Rot

Wood rot or mold is a definite indicator of new paint.  If the wood is able to rot, the paint is no longer protecting that surface.  If your paint has been allowing the acceleration of wood rot, stop waiting!  If you act fast enough, instead of facing full wood repairs, you may be able to cut out rotted spots or just treat it to a good sanding and priming.

wood rot

Previous Paint Was Lead-based

Lead paint was banned in 1978 due to its incredibly detrimental health effects.  If you bought a house built around or before that time, you should call a painter to have your paint tested.  Please do not remove lead paint on your own.  Expert painters are well-educated in the “art” of removing and properly disposing of this paint.  Don’t wait with this one!  Your family’s health is at risk!

If your home has any of these signs on its exterior or interior (especially if you’re dealing with lead paint!) and you are near Durango, please give us a call to have us do an inspection and estimate.  As always, your initial meeting and estimate are free!  Call 970 903-4305.

Budget-friendly Tips to Modernize Your Home 

If you have ever looked at your home and thought it could use a huge overhaul to bring it to the present, you may be excited to find out that it does not take much money, time or effort to make your home look modern.  Yes, I would love to tell you the a fresh coat of paint can fix it all, but there are a lot of options.  Here are some easy, affordable ways to modernize your home:

modern home
Photo by: idesignarch.com

Pillows

Perhaps the simplest and quickest fix you can make is New funky pillows that pair well with your couch can really amp up the look of your living room, or bedroom.  Choose a contrasting color to really make your furniture pop.

Window Treatments

Old vinyl blinds or drab curtains can make any room look twenty years older.  Consider swapping out blinds for new shutters or curtains.  Even a change in a curtain rod can make a huge difference for little money.

Paint It

This one probably does not come as surprise because paint is a cure-all that can fix almost anything!  Color is huge here.  Neutral colors like grays and tans are very elegant-looking and timeless.  Even though some wish wallpaper would die already, it still has its place in some rooms.  If you have a room that has been wallpapered improperly or has an outdated pattern, swapping it to a fresh modern paint color can bring your room into the this decade.  Even a simple fix like repainting a door, fireplace or adding an accent wall can make a world of difference.

Molding and Trim

A house without trim around the doors and walls does not necessarily look old, but it looks unfinished.  Crown molding is a timeless addition that can really make your house look like a million bucks.  It is a small detail, but it is a noticeable one!

New Lighting

Old halogen lights are a sad thing.  Do yourself a favor and find a new light fixture that ties into the color palette of the room.  A new-to-you chandelier can really set off a room and cast it in a new light (sorry, couldn’t help myself!).  Save yourself hundreds by looking for new light fixtures at thrift stores and garage sales.

Look at Flooring

Carpeting really sets a tone for a room.  It can really create a warm, cozy environment, but more often than not a wrong length, color or texture can make your house look like your grandma’s back in the 70’s.  Consider new laminate or even wood flooring to really make your home look elegant.  Nowadays, they have laminate that is incredibly convincing as a wood floor or tile substitute for a fraction of the price.  With a little paint and elbow grease, you can make almost anything used fixture you buy look new.

Accessories

A new picture or mirror in a room makes the walls more attractive for as little as a few dollars.  If you have a little more to spend, a new coffee table or chair could also achieve a more modern room.

Clean and Declutter

This one might annoy you (it does me!), but removing clutter from your home is perhaps one of the quickest, most affordable fixes to make your home look more modern.  Just organizing your coffee table or kitchen counter can remove the distraction of the clutter and refocus your attention back on the décor of your home.  Even a good window cleaning can make a room look that much brighter.

If your home could use the modern effect of a fresh coat of paint, let us know!  Mention you read this post to receive a discount on any summer interior work you have!  If you live in or around the Durango, Bayfield, Cortez or Pagosa Springs area, we can help with your painting and wall covering needs.  Our estimates are always free!  Call anytime at 970 903-4305.

Why Hiring a Professional Painter Will Save You Money

Why hiring a pro painter will save you money
Source: Trilogy Builds

We know the Do-It-Yourself route is becoming increasingly popular because of free tutorials and articles rampant on the internet (heck, we provide them all the time!). Though many could argue that painting it yourself will cut costs, it really depends on what you’re willing to live with. Sometimes it really is worth it to invest in the strengths and expertise of a professional painter and here’s why:

Paint Material Expenses Are Less

Professional Painters have more leverage when buying paint because they do so often and in larger quantities than a DIY homeowner.  Most paint stores understand this and offer professionals a “pro deal” of some sort which gets passed down to the customer.

Damages and Injuries Less Likely

The prep work before painting begins is often some of the hardest work there is.  This process is just standard procedure for painters.  They know how to begin a job properly so furniture, appliances floors and other objects in or outside your home do not get damaged.  Knowing how to tape off properly means cleaner lines, too!

As far as injuries go, if your paint job requires a ladder or scaffolding of any kind, the likelihood of injury increases significantly.  Most ladder injuries happen between 2’ and 6’, so it does not even have to be a huge ladder!  In addition to ladder injuries, if you have ever painted a ceiling before, you know neck pain is real!

Painters do this work full time, so they practice techniques and procedures that prevent injury.  A DIY painter has a higher probability of missing work, needing medical help, etc.

Preference for Higher Quality Materials Means Paint Lasts Longer

I should start off with the disclaimer that not all painters prefer to paint with the best.  Most do though because they know you will be happier in the end and more likely to refer them.  Some paints require more coats, extra primer, etc.  Just choosing a better paint could save you money in terms of supplies.  Yeah, that can of paint from Home Depot only cost $18, but you will probably need 4 coats just to get it to look right and God knows how long it will last!  Most painters have tried all the paints and know what lasts longer, covers well and looks best in specific settings.  Sure a paint store could give you some pointers, but a painter will see and know your house and be able to give you more tailored advice.

Painting Supplies Are Already Owned by the Business

Just painting a basic living room could add up in terms of special drop cloths, brushes, and rollers.  If you needed a professional sprayer or scaffolding for instance, your job just jumped up into the thousands.  Professional Painters often own this equipment already and will use every tool in their arsenal to make to job stand out.

Better Process Means Paint Lasts Longer

I know I’m beginning to repeat myself, but knowing how to tape off a living room, what brush to use on a ceiling, how thick to lay the paint, what sheen to use, what color complements existing colors, how many coats and what kind of primer to use can make all the difference in a room you love for years or one you want to repaint immediately.

Your Time Is Money

It is estimated that one in five DIY painters end up hiring a professional painter anyway.  Most of us already work a full-time job and only have a few hours in the evening and weekends to unwind.  Do you really want to spend them painting?  A team of painters with years of experience will take a job that would normally take you months to accomplish in your spare time and finish it in a few days.  These are just reasons hiring a pro could save you money.  This does not cover why hiring a professional could also save you lots of stress, frustration and precious time with family!

If you live in Durango area and would like a free estimate, please don’t hesitate to give us a call anytime at (970) 903-4305.    We promise to do a professional job every time!

How to Make a Small Bathroom Look Huge

Yes, paint color has a lot to do with the perception of size of your bathroom, but you would be amazed at other fixes you can make.  If a huge bathroom remodel is not in your budget, here are some ideas on how to make your small bathroom look huge for a few hundred dollars – if that!

How to make small bathroom look huge
Source: Trilogy Builds

Floating Vanities

Floating vanities or vanities without legs may seem like a fad to some, but not having legs on your vanity opens up your wall, giving the appearance of more space and makes the room look bigger.

floating vanity
Source: http://zigshot82.deviantart.com/art/smpl-bathroom-119590880

Choose White

This one probably won’t come as a surprise to you.  White reflects light and light opens up a room making it appear larger than it truly is.  Choosing white does not just mean paint color – it includes tiles, toilets, showers, etc.

Choose white paint and fixtures to make bathroom bigger
Source: http://www.theloop.ca/13-sneaky-tricks-to-make-your-bathroom-look-bigger/

Streamline by Choosing Similar Tones

Not everyone loves the look of white or can afford to redo their entire bathroom in white.  If you already have a pronounced color scheme that you’d like to keep, try to mirror it with paint, tiles, carpets, etc.  The only suggestion here is to stay away from dark colors.  If you already have a dark color scheme going, try to choose lighter tones in that color scheme.

Streamline tones to make bathroom look bigger
Source: http://quinju.com/2016/03/19/painting-bathroom-color-mood/

Natural Light

Sheer curtains, white shutters or frosted windows can do a lot of good by offering privacy while still allowing natural light in to brighten up a small room.

Let in natural light to make bathroom look bigger
Source: http://www.myhomeideas.com/room-galleries/timeless-natural-bathroom

Reflect Light with Mirrors

This one is an old one, but a good one!  Instead of tacking up a small mirror, consider an oversized mirror or adding a full length mirror somewhere to reflect more light and give the illusion of a larger space.

Reflect natural light with mirrors to make bathroom look bigger

Source: http://safarimp.com/bathroom-vanities-mirror/bathroom-vanity-mirror-replacement-2016-bathroom-ideas-amp-designs-intended-for-bathroom-vanities-mirror-ideas

Open Shelves

Instead of relying on cabinets and vanities, consider open shelves.  Cabinets and traditional vanities are solid and take up a lot of visual wall space.  The open shelves will break up the wall, but still show enough of it to make the room look bigger than it is.

Open shelves give illusion of more space in bathroom
Source: http://creativefan.com/bathroom-storage-ideas/

Small Furniture

Most people think they will make the most out of their bathroom by choosing large tubs or vanities.  Quite the opposite is true – large furniture will not only take up too much space, but look out of place.  A bathroom with smaller pieces looks more elegant and spacious.

Small furniture makes small bathroom look bigger
Source: http://www.theloop.ca/13-sneaky-tricks-to-make-your-bathroom-look-bigger/

Clear Glass

While there is nothing wrong with a tasteful shower curtain, a clear glass door will make any space look bigger.  You will be able to see through to the shower or tub instead of closing it off.

Clear glass around shower makes bathroom appear larger
Source: http://www.vistaremodeling.com/content/clear-glass-shower-enclosure-travertine-tile

Small Sink

This follows the same logic of small furniture – try a pedestal sink.  They are white (reflecting that natural light!) and also very minimal.  Not to mention a cabinet that no longer takes up so much space.  You can pair it with floating shelves or a corner shelf for a sleek modern look.

Pedestal sinks are minimal and modern making bathroom look big

Source: https://www.mrhandyman.com/blog/2012/april/master-bathroom-ideas-master-bath-makeover/

If you need help with bathroom painting or renovations and you’re in the Durango area (La Plata and San Juan County), please give us a call anytime at (970) 903-4305.

Spruce Up Your Interior Stained Wood Work

There are many advantages to using wood for your window sills and doors.  Besides offering a beautiful look, wood is an excellent insulator.  Trouble is, wood is more vulnerable to scratches than most man-made alternatives.  If you have stained wood work in your home that needs a little time and attention to look like new again, do not fret.  You would be surprised, but scratches, worn-out window sills, dingy door edges, and wood that lost its sheen are all relatively easy repairs.  Today, we want to show you how to restore your stained wood to look new again!

diy-staining

For this project you will need: a fine sanding sponge, a touch up stain of similar color (Minwax Wiping Stain or stain left over from construction), Minwax Wipe On Polyurethane, two clean rags and/or tack cloth.  Optional: Gloves for applying stain and polyurethane.

Notes: When using a rag to apply stain, the more stain you apply and the longer you leave it on to dry before wiping off the excess, the darker the color will be.  It’s best to test a spot by lightly applying stain and immediately wiping off to get an idea of how dark it will be.  It’s easier to add more stain later than to strip it off!

Step 1

With your sanding sponge, lightly sand scratches to clean things up and flatten out grooves in the clear coat.  Take care not to sand too far into the stain color.  You just want to sand down to the clear coat.

Step 2

Using a clean rag or tack cloth, remove all dirt and dust from wood.

Step 3

Using your similarly-colored stain and a clean rag, wipe on your first coat of stain.

Step 4

Wait at least 10 minutes for first coat of stain to dry completely.  Optional: Lightly sand with sanding sponge before applying second coat if you want an extra-smooth finish.

Step 5

Apply second coat of stain and wait 6-8 hours.  Optional: You may wish to sand again after about 15 minutes of allowing second coat to dry. 

Step 6

If you are not satisfied with color (i.e. it’s still too light), apply a third coat of stain and again wait 6-8 hours.  Once you are satisfied with stain color and it has been given ample time to dry, you are now ready to apply polyurethane as the finishing coat.

Step 7

Using your second clean rag, wipe on a light coat of your Minwax Wipe On Polyurethane.  Be sure not to get any polyurethane on surrounding walls, etc.  Polyurethane will be visible on walls if you’re not careful.

Step 8

After about 2 hours of letting the polyurethane dry, apply a second coat if you wish.  Again, make sure to protect wall paint, furniture, etc.  A second coat is not required so if you’re happy with the end result, feel free to forgo it!

Please let us know in the comments below or by email how your project turned out! We love pictures!  If you need further assistance and you live near the La Plata or San Juan County area, don’t hesitate to call for an in-person estimate!  Of course, you can always shoot us an email if you don’t live in the area and need further advice.