How to Install Baseboard, Casing and Trim like a Pro
Installing baseboard, casing and trim like a pro requires that right materials and tools. Most walls and joints are rough, uneven and not square. Precision cuts and a few tricks and tips will make all the difference giving you well-fitted joints and smooth seams.
Begin by determining how much baseboard you will need. First measure each straight section of every wall and round up your measurement to the nearest whole foot that is divisible by two. Try to purchase your product a week or more before you are scheduled to install it so that you can bring it indoors to acclimate. Start by running baseboard against the inside corners and work in one direction only toward outside corners.
Measure twice and cut once is a saying that will come in very handy. Measure then cut the baseboards for each wall. Keep in mind that boards that will meet at outside corners should be cut a few inches longer than the length of the wall to allow for your miter cuts. A pro tip is to number each board on the back and copy that same number on the corresponding wall where the cut piece will go.
Use a stud finder to find and mark the wall studs so that you will have a firm spot for nailing the trim. Since studs are usually positioned 16 inches on center once you’ve found the first you should be able to locate the rest just using a tape measure. You can always verify the marks with a quick nail.
Use a 4-foot level check to see if the floor is level. If it is not then move your level along the floor to find the lowest point. And mark it by lightly tacking a scrap piece of trim to the wall.
The top of this temporary piece of baseboard will be your benchmark. Every few feet horizontally mark the same level around the room. Using the horizontal marks snap a chalk line around the perimeter of your room to identify the top edge of the finished baseboard when it is installed.


Start at an inside corner and hold the first piece against the wall. After you have leveled it, nail it in place.
Scribing will give you the tightest fit so set your compass points to cover the vertical space between the chalk line you snapped and the board’s top corners.
Keep the spread of the compass’s legs and hold the pencil on both the baseboard and the point against the floor. Then slide the compass along the floor over the length of the board while keeping the compass’ points aligned vertically.
Set a 2 to 5 degree bevel using a circular saw and cut alongside along side of the scribe line so that the cut face will be on the side toward the wall. Use a block plane to trim the beveled side down to the line. When the finished scribed baseboard is put back against the wall, the top edge will line up with your snapped chalk line.
After you have set the scribed piece in place hammer two finish nails at each stud location. Angle the nails slightly downward and hammer near one near the top and one near the bottom edges. Use a nail set to sink the nails just below the surface.
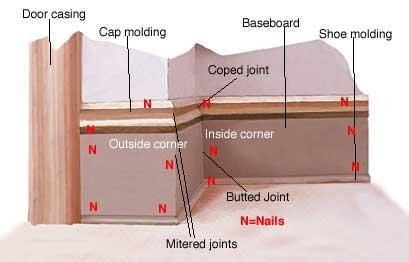
Now tightly fit one end of the baseboard to the inside corner (or casing) and draw a vertical line up the back of the board using the outside corner edge as a guide to show the direction of the miter mark the top of the board.
Adjust a compound miter saw to 45 degrees and make each miter cut of the line leaving you room to make small adjustments. Put both boards in place and examine the fit. If you need to make adjustments use a block plain and trim the pieces until they fit snugly.
Biscuits will make sure those outside miter joints stay tight together. Using wood glue and biscuits connect the two halves. Start by holding the boards snugly against the outside corner and mark across the joint. Both marks should be equal distance from one another and from each edge of the board. Position a biscuit joiner perpendicular to the board’s face cut and adjust it so the depth of the fence will be nearer to the back of the boards.
Put wood glue into each slot and the face of each miter cut. Drop a biscuit into each slot and bring the two pieces together. Mount the boards on the wall and using finish nails to attach.
If you have a wall longer than your trim make a scarf joint by mitering each end in opposite directions over a point where there is a stud. Overlap and glue the miters and then nail through the longer piece that covers the joint and into the stud. Do not nail through the actual joint.
If you’re using cap molding simply set it on the base and check to see if it fits securely against the wall. Nail it in place. If there are small gaps behind the trim and no stud for nailing, use construction glue to attach the molding and then nail the molding at the studs and come back and nail the molding to the wall until the adhesive dries.
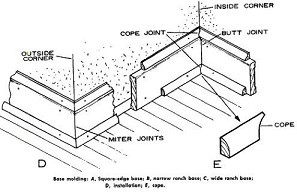
If you want to make sure you have tight fitting joints then you will need to cope them.
Coping:
You might think this is as simple as cutting 45 degree angles. However, since most (think all) walls are not straight cutting two 45 degrees angles will fit together only on straight walls but they will not fit together on most without a little help called coping.
The first piece is installed flat against the wall and up against the corner. One piece stays flat against the corner and the other piece on the adjacent wall is coped.
Here’s how:
For the piece on the adjacent wall use a length longer than the wall… no need to measure yet since you want the room to have for re-cutting. Cut a 45 degree angle as normal. The outside face will be the short side.
Turn the piece upside down (the finished side is still facing toward you). Use your miter saw to cut a 45 degree angle in the exact opposite angle of that first cut. Don’t let the blade go completely through.
Use your coping saw to follow the curve of the trim’s design and carve out the back. Now it will butt up against the fixed piece already attached to the wall.
Finish up your room by sanding all the mitered corners before you prime and paint.
Installing baseboard can be a great way for perfecting your carpentry skills. The joints required for baseboard and casing and other trim projects are miters, butts and copes and the basic techniques apply to all styles and types of trim work. If the thought of the project alone overwhelms you, call us and we would be happy to help!
https://www.familyhandyman.com/carpentry/trim-carpentry/interior-trim-work-basics/view-all/
http://www.diynetwork.com/how-to/rooms-and-spaces/doors-and-windows/how-to-install-door-casing
https://www.familyhandyman.com/carpentry/trim-carpentry/how-to-install-baseboard-molding-even-on-crooked-walls/view-all/
https://www.bobvila.com/articles/how-to-install-baseboard/#.WfpXsltSycw
https://www.familyhandyman.com/carpentry/trim-carpentry/how-to-cope-joints/view-all/
https://www.wikihow.com/Install-Baseboards
https://www.oneprojectcloser.com/cut-baseboard-molding-with-a-coping-saw/