Do It Yourself Christmas Gifts
There is nothing quite like a handmade gift from a loved one. They’re charming, thoughtful and personal. Few things provide as much delight to the giver as the time and effort involved to make something special for someone special. Give Christmas gifts that defy the norm. We’ve included a few suggestions for the littlest ones in your house to make as well as some for you older kids.
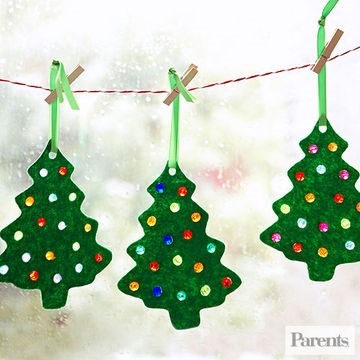
Oh, Christmas Tree…
Using a Christmas Tree-shaped cookie cutter, cut out little trees of your own using green felt. Then with multi-colored plastic beads, hot glue them onto the felt as little “ornaments”. These trees can make little ornaments themselves or you can string them across your window as little Christmas decorations (as pictured below).
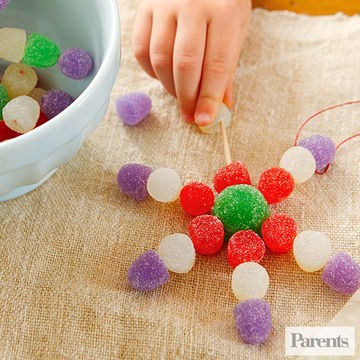
What a Flake!
Stick six toothpicks into a large gumdrop and stack smaller gumdrops to make an ornament that’s sweet enough to eat. See the Parents.com tutorial here.
Thumbprints Trinkets
There are perfect because they allow parents, grandparents, even spouses to have a reminder of their loved one right on their keychain. A Girl and a Glue Gun says, “Start with some Sculpy clay, roll it out and use your favorite cookie cutter to cut a design. Press your favorite person’s finger print onto each one.” You’ll want to leave a hole in each one at the top so you can slip on a jump ring. Then follow the sculpy clay instructions for hardening times. She suggests carving your child’s name into the back. I would add their age because I’m sentimental like that. If you want to paint them, you could even gift them as a necklace – though painting isn’t necessary to do this.
This excerpt taken from Life as Mama:
There is nothing more comforting to a grandparent than a hug. Remind grandma and grandpa how much your little one’s love them with a special package full of hugs! Decorate your background paper in festive Christmas colors and add a little glitter for fun.

Source: Life as Mama
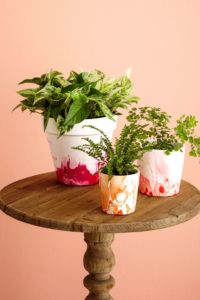
This excerpt taken from House Beautiful:
To make these beautiful watercolor pots you’ll need a Terracotta pot, Sponge paintbrush, Waterbone Bonding Primer, White Acrylic Paint, plastic bucket of rub, nail polish and a wooden skewer.
- On a protected work surface, brush a coat of primer onto the exterior and the inner rim of a clean pot. Once dry, apply two or more coats of paint, letting the pot dry completely between coats.
- Fill a bucket with enough room-temperature water to fully immerse the pot. Drizzle about ¼ of the bottle of nail polish over the water to create a film on the surface. Immediately use a skewer to swirl the polish before it gets too sticky, then dip the pot into the water bucket at an angle and rotate it, allowing the polish to adhere.
- Pull the pot out of the bucket and let the water drip off. Then, place it upside down on your work surface to dry. Flip it over and fill with a leafy or flowering houseplant.
- Weatherproof your pot.
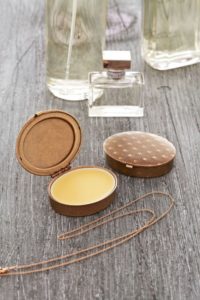
This excerpt borrowed from Country Living: To create your own Solid Perfume signature scent, first take two perfume compacts (buy online) and place a liner in each one. Then, mix 1½ teaspoons of jojoba oil and 25 drops of essential oil (rose, lavender or your favorite) in a glass and set aside. Melt ¾ teaspoon of grated beeswax on low heat in a glass bowl over a double boiler for 5 to 10 seconds. Remove beeswax from heat and stir in the oil mixture. Reheat for 10 seconds. Pour the mixture into the compacts, then let cool completely.
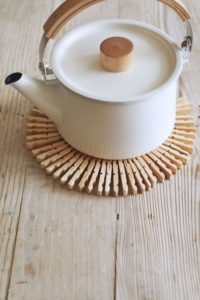
Whip up a rustic table trivet from wooden clothespins and floral wire. Country Living says, “Simply disassemble 40 clothespins and lay them flat side down, and drill a hole in each, about ½ inch from the tapered end. Thread the pins onto the wire with the double-notched sides facing right, as shown. Then, pull the wire into a circle and twist the ends to secure.”
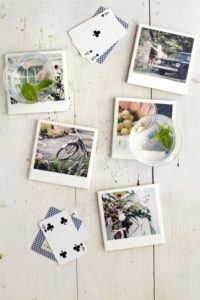
Refocus plain ceramic tiles as snappy coasters. Another gem from Country Living, “First, trim a photo to 3 3/4″W x 3 1/4″H. Using a foam brush, spread Mod Podge on the back of the image; and position it on a tile, with a 1/4-inch border at the top and sides, and 3/4-inch border at the bottom. Let dry for 30 minutes. Spread Mod Podge over the photo and exposed tile borders and let dry for one hour; repeat two to three more times. Spray with clear sealant and let dry for 24 hours. Finally, affix pads to the underside corners of your picture-perfect tiles.”
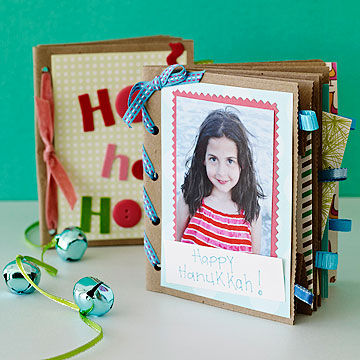
Lunch Bag Scrap Book
Excerpt from Parents.com: Store holiday cards and photos in the pockets of a book crafted from folded brown paper bags.
What you’ll need: Three brown lunch bags, scissors, hole punch, pencil, thin ribbon, glue, assorted embellishments (we used patterned papers, gift wrap scraps, buttons, stickers, rickrack, and photos).
Handmade gifts are more memorable and cherished to the receiver than most anything else you could buy a person. I’d like to say they’re cheaper too, but you could easily drop $50 or more for a project at a craft store if you’re not careful. If you like working with your hands, you will have much more fun then just shopping on Amazon. Merry Christmas and Happy Holidays to all of you!