Peak To Peak Painting Durango

How to Paint Your Garage Interior and Walls

Prep work and cleaning time will be the biggest difference between painting the garage and painting any other interior area of your home. A finished garage looks and feels more like part of your home. It makes spending time there more enjoyable and impresses potential buyers by the obvious care you have taken for your entire home.

Tools for the job:

  • Paint and primer
  • Masking tape
  • Paint rollers, tray, edging brush (extension pole if necessary)
  • 5′ Ladder
  • Vacuum with attachments or broom
  • Cloth tarp
  • Drywall compound and/or spackle
  • Putty knife
  • 200-grit sandpaper
  • Tack cloth
  • Bucket

paint a garage

Prepping your Garage Walls

The prep work is similar to the work you would do before you painted any room on the inside of your house:

  • Remove switch plate covers
  • Remove light fixtures
  • Tape around trim, doorways, electrical boxes and light switches
  • Clear the area completely, if possible
  • Fill any holes, sunken nail heads or cracks with spackling or drywall compound.
  • Caulk all cracks and seams (don’t use silicone – paint will not stick to it)
  • Use 200-grit sandpaper light sand the repairs to give a smooth finish to your repairs
  • Clean sanded areas with tack cloths to pick up the residual dust
  • Lay cloth drop cloths on the floor (plastic can be slippery)

Clean and Clean Some More

Remove dirt from the top of baseboards using a de-greasing cleaner

Sweep dirt and cobwebs from the walls and ceiling with a broom

Priming 

Now that everything is cleaned, taped, covered and caulked, the best thing you can do for your garage before applying the finish paint is to prime it. The best choice for interior garage walls is an exterior latex primer. Exterior primers reduce cracking and mildew growth and the latex offers flexibility for those changes in temperature that result in cracking. If your garage has heavy stains, then a stain-blocking latex primer will be your best solution. If you’re able, let the primer dry for a minimum of 24 hours.

Choosing the Paint

While you may be painting the interior of your garage, it is not the same as painting the interior of your home. Eggshell and low-gloss sheens work well for truly interior spaces but are not recommended for the garage because of its exposure to the weather. Thicker, latex exterior paint with its mildew-resistant components and higher gloss finishes will endure longer and be easier to clean.

Don’t assume you are obligated to paint your garage walls white just because the whole world paints their garage walls white. Does it make sense that the area where spare tires, lawnmowers, chainsaws, paint cans, garden tools, wheelbarrows, and bicycles are kept should be white? How about a neutral light blue, gray or light taupe or a color that fits well with your exterior so that when the garage door is open it will have a seamless effect?

Once you’ve thoroughly, cleaned and primed your garage walls and ceiling, it’s just a matter of putting on the paint as you would in any other room. Use a small brush to cut in the windows, doors, trim and walls first and then brush or roll on (preferred) the rest of the surface.

Painting the Floor

If you really want a totally new look for your garage, don’t stop with the walls and ceilings. Painting the floor will give your garage a showroom appeal and be the envy of the neighborhood.  If you really have a wild hair, paint the garage doors!

Garage floor

Before you consider painting your garage floor, do a moisture check first. Take a large square of plastic sheeting (2′ or 3′) and make sure the edges are thoroughly taped down to the floor. If, after a couple of days, there is water on the underside of the plastic you have a moisture problem and will need to put down a good vapor barrier before you apply a primer coat.

Don’t begin to paint your garage floor without checking the weather first. The outside air should be at least 60 degrees and getting warmer and the garage slab must be a minimum of 50 degrees otherwise the epoxy will never set.  We live in Durango so even in the summer, temperatures can soar into the 90’s mid-day, but drop to the low 40’s at night.  Be sure you pick the right time of year or hire professionals who have the right equipment.

In addition to the tools for painting the garage walls, here are some more helpful tools:

  • Medium-nap, lint-free roller and nylon paintbrush
  • Stiff-bristled nylon push broom
  • Safety goggles
  • Odor mask with filters
  • Epoxy crack filler or concrete filler
  • Squeegee
  • De-greaser
  • Epoxy paint or kit
  • Kitty litter or sawdust
  • 200-grit sandpaper
  • Tack cloth

One thing that remains the same as prepping the walls is the cleaning. Clean, clean and clean some more.

Remove ALL oil and grease using a layer of sawdust or kitty litter. They absorb excess oil very well but be sure to leave the whatever material you use on the floor for at least 24 hours. After you’ve absorbed the excess oil and grease and cleaned up the sawdust or kitty litter, pour a concrete cleaning solution directly onto the stains and leave it to sit for about an hour. Rinse it with boiling hot water and scrub with a broom.

After all the heavy stains are gone wash the entire area with a diluted de-greaser.

Repair

An epoxy paste can be used to fill in cracks in the floor. After drying, finish the repair by sanding it smooth or, depending on the size of the crack, grinding the area smooth so that it is flush with the surrounding floor.

When everything is cleaned, patched, and the floor is dry, test your floor to see if it should be etched. A slightly rough surface will allow the paint to absorb and adhere better. Sprinkle a little water on to the floor. If the water forms small droplets, the floor will require etching. If it quickly absorbs, no etching is required, and you can go on to seal/prime your floor. You can etch the floor by getting a concrete etching solution from your local hardware or home improvement store. Follow the directions on the product and finish by rinsing thoroughly. Retest to ensure that water dropped on to the floor does not bead up.

Dry Thoroughly

Use as many fans as you must to completely dry the floor.  It may take longer than one overnight especially with cooler temperatures.

Sealing/Priming

Before you begin to seal and paint the floor, ensure that your garage is very well ventilated and that airflow is constantly circulating throughout the area. Sealing the garage floor can act as a primer and help reduce moisture. The sealer should be a solvent-thinned epoxy or a water-based floor epoxy. Just like the walls, cut the trim in using a small brush and then use a lint-free, medium-nap roller to liberally and evenly apply the rest of the sealant to the floor. Don’t apply paint for at least 8 hours.

Painting the Floor

Begin the final step by using an epoxy paint or paint kit (with flakes) designed and created especially for use on garage floors. Follow the directions and apply the first coat by cutting the edges in using a nylon brush and a lint-free roller to create a thin layer. Dry the first coat for at least 24 hours or until thoroughly dry. Apply another two coats, drying thoroughly between each, for extra protection and durability.

Follow the directions from the epoxy paint kit to cure the paint completely. It may be as much as a week before you’re pulling your cars into your newly finished garage, but it will be well worth the time spent. Freshly painted walls and a new epoxy floor are a great way to give new life to an often-neglected but important part of any home.

Some of you may eat this stuff up, while the rest of you roll your eyes and scoff.  That’s the beauty of hiring someone like me – we love this kind of work!  See projects we’ve done in the past here.

Sources: via, via, via, via, via, via, via

What Temperature Can I Paint My House?

Painting a house can be a daunting task in and of itself. Deciding on what colors to paint and obtaining the correct materials to splash on a new color on the outside of your house are just the beginning steps though. An important aspect to consider when you decide to paint your house is the weather, which, for the most part, is out of your control. For those of us who live in Durango, you know the temperature can change dramatically in a matter of minutes! However, when you factor in the weather, you will be able to predict the best time to undertake your painting endeavor.

Temperature to paint house

Best Time and Temperature to Paint

Depending on the type of paint you have purchased, the temperature requirements can vary, which makes it important to read the manufacturer’s specifications for the paint you will be using. Typically, when using an oil-based paint, there is a wide range of temperatures at which it would be appropriate to paint outside. The rule of thumb when using this type of paint is to apply it when the outdoor temperature is between 40 and 90 degrees, which allows for the application to be completed during the majority of the year in most geographical locations (Janeway, 2017). When temperatures dip below this recommended range, it can make the paint quite thick, with some brands or formulas turning into a semi-solid state during cold weather (Rodriguez, 2016).

While the temperature may be right during the application period, but the curing period during which the paint will be drying also has to be above a certain temperature to ensure that the paint dries and cures sufficiently. An ineffective curing period can lead to a decrease in the durability, as well as inviting the growth of mildew and stains on your newly painted exterior (Janeway, 2017). It is recommended that the temperature not drop below freezing during the curing period, which may take upwards of a few days. As such, it is important to pair your outdoor painting projects with the weather forecast to ensure that the application and curing times are not hindered by cooler evening weather.

However, cold temperatures are not the only thing to look out for when deciding when to paint the exterior of your house, as the heat can also affect the ability for the paint to be applied and can influence the quality of the curing stage. When the mercury exceeds the 90 degree mark, outdoor painting is not recommended, particularly since the surface of the exterior of your house will most likely be warmer than the ambient air (Consumer Reports, 2016). Painting during times where the temperature is above 90 degrees, it can affect the drying time of the paint, leading it to dry too fast. When paint dries too fast, the application process may not come out even and you may notice brush marks, two things that you do not want to happen when you paint the exterior of your house (Consumer Reports, 2016).

Hacks for When the Time Is Not Right

While there are industry standards that are set for the temperatures, during which application is ideal, the weather may not always follow the forecast. In these instances, there are a few tricks of the trade that you can use when the temperature is not cooperating with your outdoor painting plans. For instance, if you are using a latex-based paint, there are additives available to reduce the thickening effect that cold weather has on this type of outdoor paint (Rodriguez, 2016). It is also a good idea to turn the heat up inside so that the exterior walls can warm up, allowing your paint to dry faster. Additionally, if you need to paint outside in less than desirable temperatures, try to paint between 10am and 2pm, when there is minimal wind present. You will also need to extend the time between coats of paint, as cooler weather can hinder the curing and drying processes (Rodriguez, 2016). Another good idea is to use scaffolding to drape tarps over, which allows the section you are working on to be out of the elements, and with the addition of an outdoor source of heat, it can help to increase the temperature of the surface and ambient air, leading to better paint coverage and drying.

Can I Use Interior Paint to Paint the Exterior of My House?

In a word, no. Interior and exterior paints have different formulations to withstand the environment in which they are intended to be used. While all paint contains resins, color pigments, additives, and solvents, there are some stark differences between the ingredients in exterior and interior paints (Primetime Paint & Paper, 2013). Exterior paint is also designed to be more durable, resisting fading, peeling, and chipping, which you may experience if you were to use an interior paint to paint the outside of your home.

Conclusion

Painting the exterior of your home can improve the value and resale of your home. However, the quality of your paint job can greatly influence the added value associated with a new coat of paint. Variables such as weather, humidity, and the type of paint you use can affect the outcome of your project. As such, it is recommended to read the manufacturer’s instructions as they pertain to the ideal temperatures for your specific product. If you are in doubt, you can always contact a professional to assess the conditions and, if necessary, assist you in your painting endeavors.

References

Consumer Reports. (2016). What is the best temperature to paint outside? Retrieved from http://www.consumerreports.org/exterior-paints/how-warm-is-too-warm-to-paint-my-house/

Janeway, K. (2017). How cold is too cold to paint outside? Retrieved from http://www.consumerreports.org/exterior-paints/how-cold-is-too-cold-to-paint-outside/

Primetime Paint & Paper. (2013). What’s the difference between interior and exterior paints? Retrieved from http://primetimepaint.ca/2013/whats-the-difference-between-interior-and-exterior-paints/

Rodriguez, J. (2016). Professional tips on cold weather painting. Retrieved from http://www.thebalance.com/professional-tips-on-cold-weather-painting-844925


Why Brick is Coming Back

Brick has pretty much been around since there were building materials. It began its popularity in American homes as the centerpiece, the chimney.  Since trees were abundant most early Colonial homes brick use was initially limited to the initial chimney.  Brick escalated as a primary building material during the Georgian era of American home building.

Why Brick is Coming Back

The undisputed advantages of brick remain the same today as they were a century ago:

Genuine clay brick is made from natural materials.

Brick is primarily made from clay along with shale – among the most abundant, naturally occurring materials on earth.

  • Brick offers superior fire protection, high wind protection, moisture and insect control.
  • Brick is energy-efficient.
  • Brick can be repeatedly salvaged.
  • Brick has more than a 100-year lifespan and it’s not uncommon to see century-old buildings still in use.

Maybe the best advantage of all – the older it is, the better it looks!

No wonder brick is making a great comeback!


Drywall can hide a lot of secrets including beautiful brick walls to the surprise and delight of many homeowners and designers.  Exposing the brick can be a bit laborious and very messy but the results are absolutely worth it.  Exposed brick immediately adds interest, character, warmth, and texture.  Whether it’s left raw or you choose to paint it, newly revealed brick interiors are coveted and have become one of the latest and hottest trends in home design.  Normally, when you think of a design trend you think of a limited life-span but brick is, and remains, timeless and suits every design style, size of home and shape.  Nothing adds to the architectural style and charm of a home like brick.

Building standards have changed so much over the decades that mass-produced building components, instant framing modules, and other systems have intentionally resulted in more homes being built at faster rates and for less money and that leaves building solid brick homes scarcer than ever before.  No wonder the discovery of a brick wall in your home is so exciting.

Original, vintage brick creates a warmth in even the most modern homes and can be incorporated into every style and look.  Whether a fan of box-style modern homes: clean, white and crisp or a fan of homes of days gone by like Craftsman or Victorian, brick works.  Because brick varies so greatly in color it can be painted to suit your home’s own unique style.  Warm whites and soft grays look wonderful in more modern spaces while rich reds, ambers and darker colors are right at home in rustic, old-world spaces.

If you have a home with a brick interior or a single accent wall it’s probably irreplaceable so take care of it.  Hanging anything on brick should be done by a handyman familiar with brick and who has the right tools and knowledge to get the job done without damaging the brick.  The same advice applies to painting your brick walls or brick fireplace.  It’s well worth it to hire a professional.  The steps themselves aren’t especially complicated but if you’re used to a roller and a paintbrush and a primed flat surface your brick walls are not the place to learn.  There are a number of products that are formulated just for masonry and will adhere and last for years as opposed to products made for other surfaces.  Your professional will know which products are best.  If you are a committed DIY’er be prepared to clean the brick surface thoroughly with a stiff bristle brush and some TSP before you think of taking another step.

If you really like the look of brick, and who doesn’t, but don’t have those luxurious brick walls, you can still create beautiful texture and drama on a smaller scale by introducing a brick design into the kitchen as a backsplash.  A brick backsplash will create a stunning feature that enriches the whole room.  Even in limited-use raw brick creates a new ‘historic’ element that adds warmth, color, and texture to a room.

Brick exteriors are equally desirable as virtually no other building material offers the same comforts.  And few other materials are as substantial and can make you feel as secure.  Home maintenance practically disappears.  Brick is a natural noise reducer and keeps you from the sound of wind and rain and traffic.  Few homes offer more durability than brick homes.  For many, a brick home conveys quality, substance and classic style.

Whether inside or outside brick is timeless and exposed interior brick walls are truly a luxury too few homeowners have.  While brick is practical beyond measure it is also the essence of history, elegance, and warmth all at the same time.

Sources:

http://www.chicagotribune.com/classified/realestate/ct-home-0706-brick-homes-20120705-story.html
http://www.gobrick.com/resources/why-choose-brick
http://moss-design.com/brick/
https://baltimoreheritage.org/resources/anatomy-of-a-rowhouse/
http://www.baltimoresun.com/features/chesapeake-home/ph-mg-cl-exposed-brick-20150127-story.html
https://www.curbed.com/2015/12/7/9893696/exposed-brick-tired-trends-that-are-over-2015-decor
http://www.countryliving.com/remodeling-renovation/g4516/unfinished-exposed-walls-trend/
http://www.countryliving.com/home-design/decorating-ideas/a43746/pros-cons-exposed-brick-walls/
https://www.decoist.com/2014-07-17/hot-home-design-trends/

Clean Up Your Home’s Exterior in the Winter

While ice and snow may make for mesmerizing classic Christmas scenes on holiday greeting cards, neither are welcome friends of your home’s interior or exterior.  It’s best to enjoy the snow and ice and then send them packing as quickly as possible! Here’s how to keep the outside of your house looking good in the Winter.

Image source: Durango.com

Remove Snow

Eventually, snow melts and when it does that water can refreeze cause some serious problems so first things first.  Use a roof rake to thoughtfully remove snow from your roof.  It won’t do you much good if you move it from your roof to your sidewalk or crush your shrubberies underneath its weight.

Clear your walkways and driveways of snow before it gets too deep.  It’s better to shovel often than it is to wait for the snow to stop four days later. Make sure you shovel down to the concrete to keep ice from forming or building up.  Homemade de-icers are great for keeping the snow from sticking.  If you don’t mind the snow for a while sprinkle birdseed or sand to help you get traction.  If possible, avoid salt. It damages concrete, rusts metal, hurts the environment, is destructive toxic to most landscape and can hurt our pets.

Remove Ice

Ice directly outside of entrances, on steps and sidewalks, can be treacherous.  Salt, aside from the damage it causes, can cause the snow to melt and a hard freeze, later on, can turn your walkways into ice rinks.  Gravel, kitty litter, bird seed and sand are all smart ways to add traction.  If you melt the ice sprinkle some kind of grit on top so that when it refreezes it will come with built-in traction.  Do this every time there’s a thaw and refreeze.  The internet is full homemade de-icer recipes using rubbing alcohol, dishwashing soap, pickle juice and a favorite made from beet sugar juice. They’re inexpensive and simple to make.  In addition to damaging commercial de-icers, your local garden center or hardware store may have natural de-icers that are much safer for the environment and pets.  Remember, de-icers are most effective when you use them before falling snow starts to accumulate.  Spraying a de-icer on top of snow or existing ice doesn’t work nearly as well.

Remove Icicles

Icicles are so beautiful that even Christmas lights are designed to mimic their look but they can be purveyors of big problems and expensive repairs.  Get rid of them!  Use a long broom handle or extension pole to knock them down.  Be careful not to stand under them.  And knock them down gently in case your home’s gutters are full of ice or you might find the gutters coming down too.

Do You Have an Ice Dam?

Icicles may be hiding an ice dam.  Since ice dams are likely to develop at the edge of your roof pay close attention to the icicles around your home.  An ice dam has probably not formed if there is no water trapped behind them.  Water stains found on the interior side of exterior walls or along the ceiling can indicate the formation of an ice dam.  To prevent damage have a professional remove the ice dam immediately.

When it comes to the roof, it’s good to call a PROFESSIONALDon’t be the untrained homeowner trying to explain to the E.R. Doctor how you fell off the roof.

Some Quick Winter Hacks for a little bit of Everything


Keep Straws On-Hand

If your car lock is iced-up put the straw right next to the lock and blow.  Your warm breath will melt the ice.

Heated Snow Pads

They might be a little expensive but priceless when you think about no more shoveling and hacking at the ice.  They come in a variety of sizes for pathways, driveways, and stairs.
Hot Water on Concrete Pavement

If you use boiled water to melt ice on your driveway or walkway be sure to sweep it completely away to prevent any residual water from freezing and creating a hazard.

Saltwater for your  Windshield

If you don’t have a scraper or de-icer, road salt combined with a little water will remove a thin layer of ice from your windshield.   A 2-1 ratio of rubbing alcohol and water will do the same.   Finish by spraying with water and use your wiper blades to remove the slush.  Don’t use the road salt if you don’t have to.  Salt is no friend of cars!

Prepare Your Car to be Outside

Like many, one car fits into the garage and the other one doesn’t.  Before you leave your car outside, spray some Teflon into the locks and the doors’ weatherstripping.  Also, have your homemade de-icer ready to make quick work for clearing the windshields when you need to leave.
Don’t Get Stuck in the Garage
Your garage door’s sweep can freeze to your driveway and keep you from opening the overhead door.  Sprinkle or spray de-icer across the garage door entrance before a coming storm.

Now that you’ve cleaned up the outside and made it a lot safer your family, you can turn your attention to your landscape and bring out the very best of winter.  It’s not too late to add a bench or a garden sculpture to enhance your garden space and maybe even draw some attention to the beauty of stately evergreens or the haunting silhouette of your deciduous trees.

Shop local thrift stores for window boxes or hanging baskets to fill with miniature, winter-hardy Spruces or broad-leafed Evergreens surrounded by holly and rhododendron.  Suspend them from your porch or windows to brighten even the most overcast days.

It might already seem like a whole season’s worth of ice and snow has come upon us but, the fact is, it’s still early and there’s plenty more where that came from.  By keeping the home free from snow and ice as much as possible you can enjoy the winter as much as the summer.

Sources:
https://www.bobvila.com/slideshow/23-brilliant-hacks-to-help-you-weather-winter-49686/open-curtains-during-the-day
http://www.directenergy.com/blog/remove-winter-ice-home-3-steps/
https://www.bobvila.com/articles/502-winter-preparation-checklist/#.WlpY7a6nGcw
https://www.thespruce.com/easy-home-winterizing-checklist-1824721
https://www.bhg.com/gardening/landscaping-projects/landscape-basics/winter-landscaping-tips/
https://www.usatoday.com/story/money/nation-now/2015/10/25/things-now-get-home-ready-winter/74150314/
https://www.familyhandyman.com/landscaping/12-hacks-for-removing-ice/view-all/
https://www.rodalesorganiclife.com/home/5-eco-friendly-ways-to-de-ice-your-driveway
https://www.quickenloans.com/blog/winter-ice-removal-steps
https://www.travelers.com/resources/weather/winter-storms/how-to-prevent-and-remove-ice-dams

Home Improvement Trends for 2018

With the turn of the year comes a slew of new ideas and concepts. Home improvement trends seem to change dramatically each year and it can be difficult to keep up with the new ideas. Which ones will you be able to complete on your own this year? Which ones will you consider hiring a licensed, professional contractor to assist in bringing your ideas to fruition? One key thing to keep in mind when reviewing the new trends that are anticipated for this new year is to be realistic regarding your abilities so that you do not become overwhelmed.

Home Improvement trends 2018

Color, Color, Color!

One home improvement trend that has been emerging over the past few years is adding color to your interior walls and furniture. However, the colors this year are a sharp departure from the neutral tones that have been the palate of choice in the past, with deep, rich hues taking their place (McDonough, 2017). Colors are also not just relegated to the walls and furniture, as kitchen cabinets and appliances have also experienced an increase in the demand for splashes of welcoming color. This can be seen in the 2018 selection for Color of the Year, which is a deep teal called Oceanside by Sherwin Williams, that was inspired by adventure and creative thinking (Winterfeldt, 2017). If painting is not your forte, you might opt to hire a professional painter to bring your idea to life.

Bring the Outside In!

Although trees and plants can be seen dotting the landscape throughout Colorado, it can be a bit chilly during the winter months. One way to combat the chill, but still enjoy nature is to bring plants inside so that you can enjoy them year-round. While houseplants have never really gone out of style, this year will experience a growth in the number of plants that are purchased for interior decorating. However, bringing nature inside is not just relegated to plants, as evidenced by last year’s Pantone’s Color of the Year, Greenery, which is reminiscent of moss-covered stones (The Family Handyman, 2017). Interior decorators can help to incorporate greenery, whether it is through introducing houseplants to your home or selecting green hues that work with your existing interior.

Comfort is Key

One recent trend, known as hygge, was introduced to the design world a few years ago, but the Scandinavian practice of comfort, coziness, and celebrating the little pleasures of life has been in place as a design aspect to address the boredom and darkness that often occurs during the winter months (Hygge House, 2017). Building off the Danish trend, in 2018 additional foreign influence will be seen in the interior decor practices. For example, the Swedish trend of lagom and the Japanese trend of wabi-sabi will take the interior design field by storm (Tardiff, 2017). While lagom and wabi-sabi can be used on their own, they are also complementary, as each focus on embracing the imperfections and simplicity in design (Tardiff, 2017). Well-worn accent pieces can help to bring about your own version of hygge and comfort.

Going Green is Not Just for the Plants

While the presence of houseplants and green hues have been touched on as being influential trends of 2018, going green will also be a highlight of the year regarding decorating and home renovations. With the trend of homeowners tending to stay in their homes longer than previous generations, investing in sustainable technology and building materials are also expected to make a splash in 2018 (Amaya, 2017). This would include the sourcing of sustainable materials, such as bamboo, as well as investing in solar panels, energy-efficient windows and appliances, as well as reflective paint and shingles for the roof (Nichols, 2017).

Conclusion

It appears that color and sustainability are the top trends to note for 2018, with the focus on greenery and comfort. The cool winters in Colorado can be quite enjoyable outside, but inside, it can be a bleak scene. As such, introducing colors such as the mossy green of Pantone’s Greenery or Sherwin Williams’ Oceanside can help to induce a feeling of comfort, particularly when combined with soft and welcoming interiors. While some of the trends can be easily accomplished by a weekend warrior or a regular DIY-er, other projects may require the assistance of a professional for you to obtain the results you desire.

References

Amaya, H. (2017). The 9 hottest interior design and decor trends you’ll see in 2018. Retrieved from http://www.realtor.com/advice/home-improvement/hottest-interior-design-decor-trends-2018/

The Family Handyman. (2017). 16 home design trends to watch in 2018. Retrieved from http://www.familyhandyman.com/smart-homeowner/16-home-design-trends-to-watch-in-2018/view-all/

Hygge House. (2017). What is hygge? Retrieved from http://www.hyggehouse.com/hygge

McDonough, M. (2017). 10 home design trends to watch out for in 2018, according to Houzz. Retrieved from https://www.washingtonpost.com/lifestyle/home/ten-home-design-trends-to-watch-out-for-in-2018-according-to-houzz/2017/12/15/b64a9b58-df6a-11e7-89e8-edec16379010_story.html?utm_term=.23388dc048a2

Nichols, M. R. (2017). Top 5 global green building trends of 2017. Retrieved from http://www.interestingengineering.com/top-5-green-building-trends-2017

Tardiff, S. (2017). Wabi-sabi is the 2018 home trend imperfect decorators are going to love. Retrieved from http://www.elledecor.com/design-decorate/trends/a12813969/wabi-sabi-etsy-trend-2018/

Winterfeldt, M. (2017). Sherwin-William’s color of 2018 is opulent and mysterious – and that’s how we like it. Retrieved from http://www.popsugar.com/home/Oceanside-Sherwin-Williams-Paint-Color-2018-44104679


Tips to Finding Reliable Paint Pros

Painting your home can be an expensive undertaking but worth it in every way unless you made the mistake of not hiring a reliable paint pro.  So, we made finding a reliable paint contractor even easier with some very simple steps.

reliable paint pros

It’s All in the Details

When you start calling painting contractors, they are going to need some basic information to decide if it’s a job they can or are able to take.  Be prepared to describe weather, existing schedules and your time frame.  These all play into their ability to meet your job needs.  Be ready to tell them what you want to have done.  Is it interior painting?  Exterior?  What’s the size of the job?  Do you know the approximate total square footage?  Do you have a start date?

Where to Look for Reliable Paint Pros

Start with your neighbors.  Has a neighbor had their home painted recently?  Talk to them to find out if they were satisfied with their painter.  Did they give you an enthusiastic referral or a ‘we needed someone and he was driving down the street’?  What does their home look like?   Do you want your home to look that way too?

Head to the paint store!  You’ll probably find painters already there picking up paint for existing customers.  The people behind the counter will also know more about local painters and their reputations than almost anyone else including how long they’ve been doing business with them.  And you’ll have no end to the business cards you can bring home and research.

Once you have gathered a few names, start checking them out on Google, your local BBB’s website and Yelp.  Checking these resources first can be a time saver.  Why spend time making calls and getting bids when someone has already taken the time to warn you?  Don’t forget to check with your local registrar of contractors for licensing and insurance information if you’re really concerned.  You don’t want anyone with unresolved complaints.

Once you’ve done some preliminary checking, select three to meet with you to survey the job.  Pay attention to how thoroughly (or not) they inspect what they will be painting.  It should influence their estimate because even experienced painters will want more than a fast walk around your place to assess the best way to handle the project.

Every painting contractor you met should provide you with a timely written bid and every bid should include:

  • cost of labor
  • material costs
  • the number of coats of both primer and paint
  • the brand of paint, the name of the product line and sheen level
  • a thorough description of the surface preparation that will be done (eg. sanding, priming, caulking and patching, removing fixtures)
  • what is not included
  • start date and completion time line
  • references for similar projects

If you have questions in mind, ask each contractor the same questions so that you’re comparing like to like.

Experience Matters

To finish off the exterior that my friend’s painter had worked so hard on and done so beautifully, she picked out her favorite shade of green for the shutters.  He refused to paint them!  Instead he convinced her of his experience and argued that she would be dating the very house she was trying to refresh.  She ended up so impressed that she hired him to repaint the whole interior.  She figured if he cared so much about the final look, that she could trust him completely.  A professional painter doesn’t just paint. They are up to date with the latest trends, techniques, products and colors.

The References

Don’t ignore the references provided.  Call them!  Ask them about their experience.  Are they satisfied?  Were they unhappy with any aspect of the job?  When did they have the work done?  Does it still look good?

Legalities

It may seem excessive, but get proof of painter’s general liability and workers’ compensation insurance for anyone and everyone who will be on the job site. You do not want to be responsible for an accident, injury or property damage. A licensed, insured and reputable painting contractor will have no problem providing you with the proper documents.

Get a Guarantee in Writing

The work should be warrantied against peeling, flaking, excessive fading or any apparent failure that manifests within the first two years.  Just because the paint has a warranty, doesn’t mean the painter has one.   Labor is expensive.  Your guarantee should include both material and labor.

Cost

Everyone cares about price.  Both you and the painter.  Don’t let your focus being solely on getting the lowest possible price.  It may cost you more in the long run!  Instead, consider price in light of the details on the bid, the quality of the products used, the skill and experience of the paint contractor and his reputation.

Painting is something that nearly every homeowner undertakes multiples times in their life.  And painting is a home improvement project that can radically and instantly change your home’s entire look.  Don’t leave it to amateurs.  Do it right and hire a paint professional.

Sources: via, via, via, via, via, via, via, via, via

Decorate for Christmas Without Lights!

You don’t need to wait until it’s dark to light up your home with beautiful Christmas decorations.  If you want to forget the fuss of Christmas lights but still want to decorate, here are beautiful ways to decorate that will make your home a standout during the day – no lights necessary!

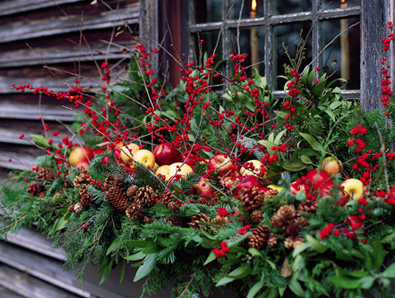
Christmas Window Box
Image Source: Windowboxes.com

Window boxes make great decorations.  They give you so much room to decorate with evergreens, holly leaves and berries and room to add your own creative touches with local plants.  Finish it off with beautiful ribbons and some thoughtfully placed ornaments.

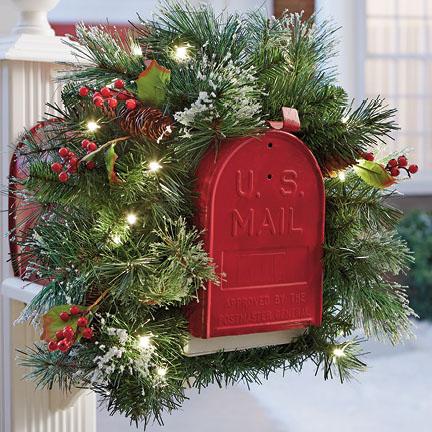
You can welcome those Christmas cards with a mailbox beautifully decorated in an abundance of winter plants.  If your mailbox is a brick-box style try sitting a large shallow planter on top and fill it with an arrangement of native winter plants wrapped up in your choice of winter red fabric.  Tuck in some extra pine cones or ornaments for a little glitter.

Christmas Mailbox
Image source: Freshfinds.com

For those of us with the traditionally shaped mailbox, drape it with garland and ribbon.  Wrap holly berries around a thin, flexible wire and use the wire to secure the garland and ribbon on those windy winter days.

Arranging a beautiful Nativity scene on your lawn is a thoughtful way to remind your neighbors and passerby’s of the ‘reason for the season’.

Garland is a versatile decoration and can add significant interest to your front entry and can be used to wrap nearly everything from deck railings, fences, lamp posts and porch columns.  Wrap it along arbors and trellises, pergolas and archways as well.  It’s maneuverability is endlessly impressive.

A stunning centerpiece is a smart way to get big impact.  A sparkling metallic vase or a sleek glass vase lined with birch bark will start you off beautifully.  Choose your favorite winter blooms for color and drama and add dimension and texture with garland, evergreens and sprigs of berries.

Give your front porch or entry way instant charm by simply filling your favorite baskets with pine cones, birch bark, evergreens and holly sprigs.  Finish each basket with a bright red or white bow.

Count it down with an Advent calendar.  You can create one in a multitude of ways, from a simple paper calendar with flaps covering each of the days or by using fabric pockets with a background scene and children’s numbering blocks are a super easy way to make your first calendar.  Arrange them by day and decorate each with a thoughtful Advent theme or a winter wonderland scene.

Cloak your backyard’s outdoor furniture in holiday fun.  Wrap winter greenery around the backs of your patio chairs, and it with large red ribbon.  Red ribbon will brighten up your light fixtures.  Unless your outdoor cushions are already red or green swap them out for traditional festive colors and don’t forget to drape a few warm, soft throws across the furniture just in case it gets a bit too nippy.

For the minimalist, fill beautifully tall, transparent, glass cylinders with ornaments and sprinkle them with a few pine cones and acorn nuts.  If you want a little sheen and shimmer add a light sweep of metallic spray paint.  You can also opt for your own personal color scheme to coordinate with your home’s design.

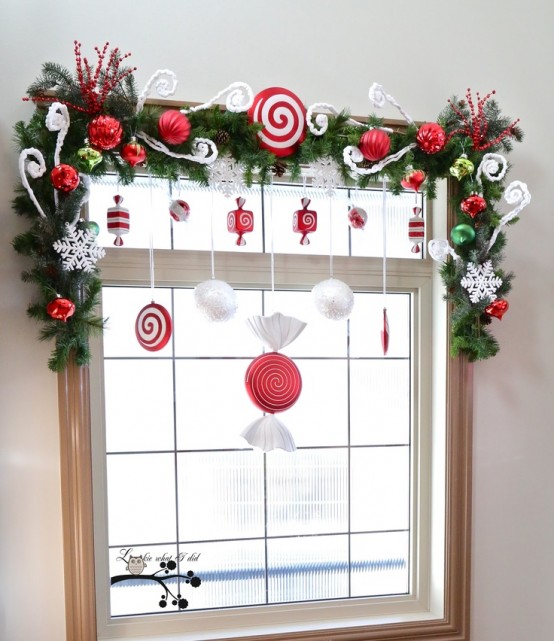
Christmas Window Decor
Image Source: Digsdigs.com

Your home will look like a snow globe when you hang Christmas decorations in the windows.  From simply hanging a gorgeous winter wreath to adorning the windows with your favorite Christmas or winter scene you can make your ‘snow globe’ as creative as you are.

Craft a traditional Christmas decorative swag for your mantel out of some common traditional materials. Birch bark has great flexibility and light and naturally beautifully patterns.  Bright red berries and miniature snow-covered Christmas trees in multiple heights will add charming holiday touches. Your bountifully full trees make perfect ornament hangers once those leaves drop to the ground.  Seize the opportunity to hang a variety of different sizes and types.

Use the underside of your patio covering to suspend lanterns with red ribbon or fishing wire.  Natural elements such as holly berries and eucalyptus make great choices to fill any size lanterns with the richness of Christmas.  Vary each ribbon’s length and make sure to space the finished lanterns far enough apart so that unexpected breezes won’t bang them together.

It’s relatively easy to decorate with lights but these very easy and affordable designs will add grace and charm and visual interest throughout your home inside and out.

Sources: via, via, via, via

Do It Yourself Christmas Gifts

There is nothing quite like a handmade gift from a loved one.  They’re charming, thoughtful and personal. Few things provide as much delight to the giver as the time and effort involved to make something special for someone special.  Give Christmas gifts that defy the norm.  We’ve included a few suggestions for the littlest ones in your house to make as well as some for you older kids.

Oh, Christmas Tree…

Using a Christmas Tree-shaped cookie cutter, cut out little trees of your own using green felt.  Then with multi-colored plastic beads, hot glue them onto the felt as little “ornaments”.  These trees can make little ornaments themselves or you can string them across your window as little Christmas decorations (as pictured below).

Ornaments
Source: Parents

What a Flake!

Stick six toothpicks into a large gumdrop and stack smaller gumdrops to make an ornament that’s sweet enough to eat. See the Parents.com tutorial here.

Gumdrops
Source: Parents

Thumbprints Trinkets

There are perfect because they allow parents, grandparents, even spouses to have a reminder of their loved one right on their keychain.  A Girl and a Glue Gun says, “Start with some Sculpy clay, roll it out and use your favorite cookie cutter to cut a design.  Press your favorite person’s finger print onto each one.”  You’ll want to leave a hole in each one at the top so you can slip on a jump ring.  Then follow the sculpy clay instructions for hardening times. She suggests carving your child’s name into the back.  I would add their age because I’m sentimental like that.  If you want to paint them, you could even gift them as a necklace – though painting isn’t necessary to do this.

This excerpt taken from Life as Mama:

There is nothing more comforting to a grandparent than a hug.  Remind grandma and grandpa how much your little one’s love them with a special package full of hugs!  Decorate your background paper in festive Christmas colors and add a little glitter for fun.

Christmas Crafts

Source: Life as Mama

Terracotta pot
Source: House Beautiful

This excerpt taken from House Beautiful:

To make these beautiful watercolor pots you’ll need a Terracotta pot, Sponge paintbrush, Waterbone Bonding Primer, White Acrylic Paint, plastic bucket of rub, nail polish and a wooden skewer.

  1. On a protected work surface, brush a coat of primer onto the exterior and the inner rim of a clean pot. Once dry, apply two or more coats of paint, letting the pot dry completely between coats.
  2.  Fill a bucket with enough room-temperature water to fully immerse the pot. Drizzle about ¼ of the bottle of nail polish over the water to create a film on the surface. Immediately use a skewer to swirl the polish before it gets too sticky, then dip the pot into the water bucket at an angle and rotate it, allowing the polish to adhere.
  3. Pull the pot out of the bucket and let the water drip off. Then, place it upside down on your work surface to dry. Flip it over and fill with a leafy or flowering houseplant.
  4. Weatherproof your pot.


This excerpt borrowed from Country Living: To create your own Solid Perfume signature scent, first take two perfume compacts (buy online) and place a liner in each one.  Then, mix 1½ teaspoons of jojoba oil and 25 drops of essential oil (rose, lavender or your favorite) in a glass and set aside. Melt ¾ teaspoon of grated beeswax on low heat in a glass bowl over a double boiler for 5 to 10 seconds. Remove  beeswax from heat and stir in the oil mixture. Reheat for 10 seconds. Pour the mixture into the compacts, then let cool completely.

perfume
Source: Country Living

Whip up a rustic table trivet from wooden clothespins and floral wire. Country Living says, “Simply disassemble 40 clothespins and lay them flat side down, and drill a hole in each, about ½ inch from the tapered end. Thread the pins onto the wire with the double-notched sides facing right, as shown. Then, pull the wire into a circle and twist the ends to secure.”

Trivet
Source: Country Living

Refocus plain ceramic tiles as snappy coasters. Another gem from Country Living, “First, trim a photo to 3 3/4″W x 3 1/4″H. Using a foam brush, spread Mod Podge on the back of the image; and position it on a tile, with a 1/4-inch border at the top and sides, and  3/4-inch border at the bottom. Let dry for 30 minutes. Spread Mod Podge over the photo and exposed tile borders and let dry for one hour; repeat two to three more times. Spray with clear sealant and let dry for 24 hours. Finally, affix pads to the underside corners of your picture-perfect tiles.”

Coasters
Source: Country Living

Lunch Bag Scrap Book

Excerpt from Parents.com: Store holiday cards and photos in the pockets of a book crafted from folded brown paper bags.

What you’ll need: Three brown lunch bags, scissors, hole punch, pencil, thin ribbon, glue, assorted embellishments (we used patterned papers, gift wrap scraps, buttons, stickers, rickrack, and photos).

Lunch bag photo album
Source: Parents.com

Handmade gifts are more memorable and cherished to the receiver than most anything else you could buy a person.  I’d like to say they’re cheaper too, but you could easily drop $50 or more for a project at a craft store if you’re not careful.  If you like working with your hands, you will have much more fun then just shopping on Amazon.  Merry Christmas and Happy Holidays to all of you!

Sources: via, via, via, via, via

How to Finish Drywall like a Professional

We all wish we were handy! Thankfully, we have the internet so we can fake it!  Tutorials these days make just about any project possible for those of us who are hard-working and can pay attention to instructions.  If for some reason, you have a strong desire to install drywall on your own, we have your back!  We will rate the installation of drywall to be a intermediate project but it is definitely plausible for most beginners!

Here is our guide on how to drywall like a professional:

Drywall Supplies

Drywall supplies
Image source: Home Depot


Now the second step would be to measure your wall and drywall. Sometimes you can use a complete sheet of drywall and just be done. Some walls can be shorter or have different dimensions which may require more or less drywall. Measure your walls and record the numbers on a sheet of paper so you do not forget. Once you have all the drywall measured for the walls you will need to plan for each open in the wall. This means plan for the windows, outlets, lights witches, and anything else that will need to be accessible.

Next, apply the drywall! Start using your drywall screws and apply from the center of the drywall and make your way to the outside. Ensure that each screw is making contact with a stud.

Trick for finding a stud: most studs are 16-24 inches apart and when you knock along the wall you will hear the space between the studs. If you have a hard time finding the stud most home improvement stores will have a stud finder.

Cutting the drywall is probably our favorite part of the whole process. What you need to do is take your utility knife and gently score a line through the drywall. Make sure you are using the tape measure or a T-square to guarantee a straight line. Now, using your knee you can create a gentle snap in the dry wall to crack your scored line. Once this is done, you can use the utility knife to cut off the remaining paper that is holding the sheet together. For all the non-linear shapes you might have to cut, carefully use the spiral saw. The spiral saw is great for cutting out the circles for light fixtures or rounded out edges for pipes/outlets.

Corners!

You might run in this problem where two dry walls sheet meet an edge and the corner is visible to the room also known as an outside corner. For these corners that stick out, you will need to use a drywall bead or trim tex to conceal and protect your corners from any future damage. Measure, trim, align and then use proper adhesive when applying the trim to the corner.

After installing your dry wall, there are just a few more steps to follow. You want to be sure to complete the job by enclosing the gaps with a wall compound, netting (or mesh), and putty knife. This step will ensure that your walls look smooth and flawless.

Here is a step by step guide (with pictures!) to follow the mudding process.

Once you get that drywall finished, or even close to finished, give us a call so we can help! We can paint, repair or smooth out just about anything you throw at us

Sources:

http://diyjoy.com/home-improvement-hacks/4

https://biggerthanthethreeofus.com/how-to-install-drywall/

https://biggerthanthethreeofus.com/how-to-mud-drywall/

https://www.homedepot.com/c/how_to_install_drywall_professional_steps_HT_PG_BM

https://www.thisoldhouse.com/how-to/how-to-hang-drywall

How to Install Baseboard, Casing and Trim like a Pro

Installing baseboard, casing and trim like a pro requires that right materials and tools.  Most walls and joints are rough, uneven and not square. Precision cuts and a few tricks and tips will make all the difference giving you well-fitted joints and smooth seams.

Begin by determining how much baseboard you will need.  First measure each straight section of every wall and round up your measurement to the nearest whole foot that is divisible by two.  Try to purchase your product a week or more before you are scheduled to install it so that you can bring it indoors to acclimate. Start by running baseboard against the inside corners and work in one direction only toward outside corners.

Measure twice and cut once is a saying that will come in very handy. Measure then cut the baseboards for each wall. Keep in mind that boards that will meet at outside corners should be cut a few inches longer than the length of the wall to allow for your miter cuts. A pro tip is to number each board on the back and copy that same number on the corresponding wall where the cut piece will go.

Use a stud finder to find and mark the wall studs so that you will have a firm spot for nailing the trim. Since studs are usually positioned 16 inches on center once you’ve found the first you should be able to locate the rest just using a tape measure. You can always verify the marks with a quick nail.

Use a 4-foot level check to see if the floor is level.  If it is not then move your level along the floor to find the lowest point. And mark it by lightly tacking a scrap piece of trim to the wall.

The top of this temporary piece of baseboard will be your benchmark. Every few feet horizontally mark the same level around the room.  Using the horizontal marks snap a chalk line around the perimeter of your room to identify the top edge of the finished baseboard when it is installed.

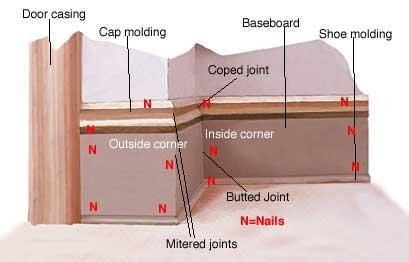
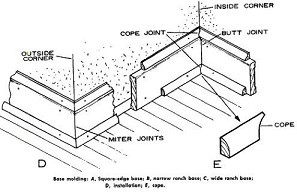
Baseboard diagram
If you’re a visual learner, this might help.

Diagram baseboard 2
Start at an inside corner and hold the first piece against the wall.  After you have leveled it, nail it in place.
Scribing will give you the tightest fit so set your compass points to cover the vertical space between the chalk line you snapped and the board’s top corners.

Keep the spread of the compass’s legs and hold the pencil on both the baseboard and the point against the floor. Then slide the compass along the floor over the length of the board while keeping the compass’ points aligned vertically.

Set a 2 to 5 degree bevel using a circular saw and cut alongside along side of the scribe line so that the cut face will be on the side toward the wall. Use a block plane to trim the beveled side down to the line. When the finished scribed baseboard is put back against the wall, the top edge will line up with your snapped chalk line.

After you have set the scribed piece in place hammer two finish nails at each stud location.  Angle the nails slightly downward and hammer near one near the top and one near the bottom edges. Use a nail set to sink the nails just below the surface.

Now tightly fit one end of the baseboard to the inside corner (or casing) and draw a vertical line up the back of the board using the outside corner edge as a guide to show the direction of the miter mark the top of the board.

Adjust a compound miter saw to 45 degrees and make each miter cut of the line leaving you room to make small adjustments. Put both boards in place and examine the fit. If you need to make adjustments use a block plain and trim the pieces until they fit snugly.

Biscuits will make sure those outside miter joints stay tight together.  Using wood glue and biscuits connect the two halves. Start by holding the boards snugly against the outside corner and mark across the joint. Both marks should be equal distance from one another and from each edge of the board. Position a biscuit joiner perpendicular to the board’s face cut and adjust it so the depth of the fence will be nearer to the back of the boards.

Put wood glue into each slot and the face of each miter cut. Drop a biscuit into each slot and bring the two pieces together. Mount the boards on the wall and using finish nails to attach.

If you have a wall longer than your trim make a scarf joint by mitering each end in opposite directions over a point where there is a stud. Overlap and glue the miters and then nail through the longer piece that covers the joint and into the stud.  Do not nail through the actual joint.

If you’re using cap molding simply set it on the base and check to see if it fits securely against the wall. Nail it in place. If there are small gaps behind the trim and no stud for nailing, use construction glue to attach the molding and then nail the molding at the studs and come back and nail the molding to the wall until the adhesive dries.

If you want to make sure you have tight fitting joints then you will need to cope them.

Coping:

You might think this is as simple as cutting 45 degree angles. However, since most (think all) walls are not straight cutting two 45 degrees angles will fit together only on straight walls but they will not fit together on most without a little help called coping.

The first piece is installed flat against the wall and up against the corner. One piece stays flat against the corner and the other piece on the adjacent wall is coped.
Here’s how:

For the piece on the adjacent wall use a length longer than the wall… no need to measure yet since you want the room to have for re-cutting. Cut a 45 degree angle as normal. The outside face will be the short side.

Turn the piece upside down (the finished side is still facing toward you). Use your miter saw to cut a 45 degree angle in the exact opposite angle of that first cut. Don’t let the blade go completely through.

Use your coping saw to follow the curve of the trim’s design and carve out the back. Now it will butt up against the fixed piece already attached to the wall.

Finish up your room by sanding all the mitered corners before you prime and paint.

Installing baseboard can be a great way for perfecting your carpentry skills.  The joints required for baseboard and casing and other trim projects are miters, butts and copes and the basic techniques apply to all styles and types of trim work.  If the thought of the project alone overwhelms you, call us and we would be happy to help!

https://www.familyhandyman.com/carpentry/trim-carpentry/interior-trim-work-basics/view-all/

http://www.diynetwork.com/how-to/rooms-and-spaces/doors-and-windows/how-to-install-door-casing
https://www.familyhandyman.com/carpentry/trim-carpentry/how-to-install-baseboard-molding-even-on-crooked-walls/view-all/
https://www.bobvila.com/articles/how-to-install-baseboard/#.WfpXsltSycw

https://www.familyhandyman.com/carpentry/trim-carpentry/how-to-cope-joints/view-all/
https://www.wikihow.com/Install-Baseboards
https://www.oneprojectcloser.com/cut-baseboard-molding-with-a-coping-saw/