Peak To Peak Painting Durango

How to Paint Your Bathroom Like a Pro!

A bathroom is a small, yet intimidating space to paint for most.  It seems like such a quick task, but once you get started, it always is more complicated than you initially anticipated.  Here are some tips and tricks (just in time for Halloween) so you can paint your bathroom like a pro!

Paint your bathroom like a pro
Paint your bathroom with confidence!

PAINT

You will want to use a semi-gloss finish of your color choice that is mold and mildew resistant.  If you have a great bathroom fan to pull away moisture, you can get away with a durable, washable high-grade satin. Bathrooms endure a lot of moisture and traffic throughout the years. You want something that will prevent against any chipping, bubbling, or cracking of your paint job.

PREP

Remove any handles, towel racks, and toilet roll holders prior to painting. This will ensure you get a seamless look in the bathroom. Small mistakes can really pop in a bathroom – especially with a semi-gloss finish. Another trick to give your bathroom a professional look is to remove the toilet tank for flawless application. Let’s face it, it is impossible to do a good job painting behind the tank of the toilet! Removing the tank is easy: shut off the water supply, flush the toilet, remove the tank bolts, and then pick up the tank!

SMALL BATHROOMS

For small bathrooms you want to make the best of the space.

Tip 1: Pick light colors to make small bathrooms feel bigger.

Tip 2: Keep tiles, walls, and decorations in the same tones.

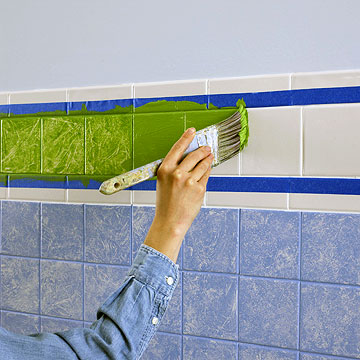
Trick: STRIPES! If you want to make a small bathroom look larger, paint vertical stripes on the wall to give the illusion larger, taller room.  Also, place the curtains of the shower at a higher level!    Paint horizontal stripes to make the bathroom look wider.

LARGE BATHROOM

With larger bathrooms you have a little more wiggle room to personalize without compromise. Pick lighter colors to for an airy feel. Bathrooms are supposed to look crisp and clean, so do not be afraid to go for pastels or whites.

Larger bathrooms are great when you want to add personality through decoration. Accent walls, decorative wall pieces, and artwork are all ways to add your personal style to your room.

Trick: Try painting the ceiling of the bathroom one color and extend that same color down the wall about 14 inches to extend the feel of the bathroom.

All in all, you want to choose whatever color is going to fit your personality. There is no right or wrong way to paint a bathroom.  Well, there is!  Just be sure to use a high quality AND semi-gloss paint to ensure you do not have any chipping, cracking, mildew, or bubbles forming in the future. Pick a fast drying, acrylic based paint over an oil based paint.

If you’re in Durango or Bayfield, call me if you run into any trouble!  I promise not to judge you and would love to paint your bathroom for you.

Sources: The Spruce, Improve Net, Home Guides


7 Ideas to Upgrade Your Home

7 Ideas to Upgrade Your Home

As much as I would like a never-ending Summer, Fall is fast-approaching and we should try to make the most of it. To do so, why not upgrade your home?  If Summer kept you too busy to make home improvements, you are not alone! Now that Fall is almost here, we have seven ideas for you to upgrade your home.

Interior and Exterior Painting

Who thinks of painting in the Fall? We do!  And now you can too!  Everyone knows that absolutely nothing transforms a home’s first impression as quickly, affordably and beautifully as exterior painting and it can be accomplished in only a week or two!  With Durango’s convenient climate and innovative exterior paint products that now enable homeowners to paint down to 35° F, there’s no time like the Fall to transform the exterior or your home. And if you’re expecting guests for the Holidays, the Fall is a perfect time to get those guest rooms ready and freshen up the rest of your home.  Many of today’s paints are low and no VOC, meaning they produce very little odor so you won’t have a lingering smell when the project is complete. Talk to your contractor today and you might find that they’re willing to give you a much better deal for the job because while they are as busy as ants in the summertime things really begin to slow down in the Fall and Winter months so why wait for weeks during the summer when you can have your house painted today!

Gardening

Don’t think that the Spring and Summer are the only times to plant those beautiful flower and vegetable gardens.  The Fall is also a wonderful time to start one or the other or even both! Durango offers a wide and beautifully varied selection of blooming flowers, shrubs and trees that can make for instant impact in your front and back-yard areas. There are even many types of winter-blooming plants and flowers to provide you with a burst of color and fall is the perfect time to shop at your local nurseries and home improvement stores. For you vegetable gardeners, you’re probably already thinking that when the cooler weather comes so does the perfect time to plant Fall crops like carrots and cabbage and… well you get the idea!

Make that Front Door Pop!

Contrasted against the white snow, your home’s beautifully painted entrance door will really stand out. Vibrant primary colors like rich reds, deep blues and lush greens are all welcoming complements to a white winter setting. Best of all, your home’s freshly painted front door can be finished in less than an afternoon.

Front Porch Shine

It’s so easy to make your front porch or entrance way shine by replacing old door handles and locks with new shiny ones and replace or add a new brass kick plate at the bottom of the door and don’t forget to enhance your home’s porch with decorative house numbers.

Insulate the Attic

Yes! Thanks to the cool Fall weather that swelteringly hot job is now a breeze.  Few things make homeowners happier than having a comfortable cool home in the summer and a cozy warm home in the winter in which to relax and read their latest all new lower utility bill! Did you know that attic insulation may extend the life of your roof and promote good air quality by reducing the need for running your home’s HVAC units? It just keeps getting better and better.

Seal an Asphalt Driveway

If left over the winter those small cracks in your driveway can lead to expensive repairs and holes come Springtime but our cooler fall days are the best time of the year for this job. Durango’s lower temps mean that newly laid asphalt will cure quicker and the VOC odor will dissipate promptly.  When those freeze and thaw cycles have run their course this spring your Fall planning will have really paid off pay off.

Treat Your Wood Decks

Durango’s views are too good to miss from your front or rear decks and the Fall is the best time to stain your home’s decks. Staining the deck in the summer’s heat will result it in drying too quickly but now that the Fall is here so is the time to find your perfect choice of stain color and not only revitalize your deck but protect it too.  Your local paint store can offer you a choice of stains and sealers. Be ready with the grill, your favorite selection of groceries and maybe even some friendly neighbors to enjoy because this fast project will be over before you know it.

Updating your home does not require a big budget or even hired help.  With a few hundred dollars at the most and a solid weekend, you could do any of these projects. We’d be happy to help with any painting, staining, or siding projects should you need us!

Sources:

https://www.sherwin-williams.com/architects-specifiers-designers/faqs/exterior-product-application-faqs https://www.trulia.com/blog/winter-curb-appeal/ http://www.durangonursery.com/calendar-whats-bloomin.html http://www.paintquality.com/en/articles/2015/01/winter-is-a-wonderful-time-for-interior-painting https://www.forbes.com/sites/trulia/2016/10/18/the-most-rewarding-fall-home-improvement-projects/#142f68a94cfa w.foxnews.com/real-estate/2017/08/31/7-great-end-summer-home-improvement-upgrades-to-do-now.html

Choosing the Right Paint Color for Your Bedroom!

Color therapy is not a new concept.  It is an alternative way to improve your health that dates back to ancient history. Different colors are associated with different moods and states of the brain. It is no surprise then that the color of your bedroom can affect how you sleep, wake up, and how you feel while you are in the room. Bedrooms are meant to be a comfortable oasis where you can unwind from a chaotic day.  Here are a few things to know before choosing the right paint color for your bedroom. 

Choosing the Right Colors for the Bedroom
Find out if the color of your bedroom is helping or hurting your sleep!

For a Good Night’s Sleep

A good night’s rest is important for many reasons, not only is it vital to maintain the overall health of the human body but enough rest can also help fight off disease. Here are a few of the best colors that promote a great night of z’s.

  • Choose a blue room for maximum sleep
    • Studies show that a blue room is associated with calmness which lead to an average of 8 hours of sleep.
  • Choose a yellow room for the second-best night of sleep
    • Studies show that a yellow room leads to an average of 7.5 hours of sleep, which was followed closely by green and orange.
  • Skip browns, purples, and greys
    • Studies show that with these colors, sleep inhabitants were getting less than 6 hours of sleep per night! You want to try to avoid obnoxious colors in the bedroom which can be over-stimulating to the brain. Dark colors can make a room feel enclosed which creates a sense of entrapment. Therefore browns, purples, blacks, and greys are not recommended for the bedroom.

For Overall Relaxation

There are many colors to choose from when trying to achieve a calming ambience. Some of the top colors that allow the brain to relax include: white, cream, navy blue, green, and sky blue. Neutral colors are a safe way to create a scenery atmosphere in your bedroom. Colors that reside in nature will also create a soothing feel in the home. God knows we have a lot of inspiration here in Durango.

Opt for washed-out colors or pastels instead of bright, vibrant colors to promote a greater sense of relaxation.

For Overall Mood

When choosing a color, you want to keep in mind the kind of mood you want to create. Colors can act in three different ways which include neutral, active, or passive. For example, the color red raises the energy of a room. The color yellow creates the effect of sunshine which is associated with joy. The color blue is associated with calmness which can decrease blood pressure and heart rate. The color green creates a sense of relaxation, especially for the eyes. Lastly, dark purple which is associated with royalty or luxury. Different colors will spark different feelings in the brain, so consider what mood you want to create for your bedroom when picking out your color.

Most people are not aware that the colors they see everyday have an effect on our moods and thoughts. Keep these facts in mind the next time you are out trying to choose a color for inside your bedroom.


Sources:

via, via, via, via, via

From Outdated Wallpaper to Updated Paint!

There is a time and a place for wallpaper, but I’m not going to lie, the opportunities for it are dwindling.  If you are ready to ditch the wallpaper and trade up for a more updated painted look, we can help walk you through it!

Removing wallpaper
A tutorial on removing wallpaper properly so paint can be applied.

Removing Wallpaper

There are many ways to do this including chemicals, steamers, and strippers. Here is a tried and true method to consider:

  1. Clear and prep your space. Protect all flooring, trim, and outlets.
  2. Buy or create your own remover solution. You can make your own with boiling water and fabric softener.
  3. This step is optional, but recommended for wallpaper that is super stubborn. Score the wall – this allows for maximum saturation when you spray your solution.
  4. Using a pump sprayer, spray the walls with solution.
  5. Remove the wallpaper – using a putty knife, start scraping the areas that you see are already peeling, edges, etc. Remove any remaining residue while being careful to not damage the wall

Note: If this process isn’t getting the job done, don’t hesitate to rent a steamer from your local hardware store.  If you don’t want to rent a steamer, you may be able to use the steam function on your iron instead!

before and after wallpaper
Photo Credit: Deavita

Hooray!  The wallpaper is off! Now what? You might be tempted to just stop here, but keep pushing on. Unfortunately, there is still old glue to remove and possible damage on the walls to be repaired.  Old glue can be removed using a putty knife and a spray bottle solution (warm water and dawn soap). Once the glue is removed, wipe off any remaining dust or grime. Next step is to patch up and repair any damage to the wall since removing the wallpaper.


Once everything is cleaned and repaired, you can begin prepping the walls. Ensure that the walls are dry before applying a primer. Once the primer is applied allow for adequate time for drying and then go ahead a paint!

Additional Wallpaper Removing Tips

  • Use a narrow, sturdy putty knife when scraping away at wallpaper! You might be tempted to use a large, wide putty knife since it might seem like it will remove more wallpaper. This is not the case; the larger putty knifes tend to be more flimsy which may cause you to accidentally gouge a hole in the wall.


  • Is your wallpaper over 30 years old? Rent a steamer to save yourself time. Older wallpaper tends to be the toughest to remove. Skip all the unnecessary headache and use a steamer right from the start.


  • Wallpaper has two layers, the top layer (holds the design) and the paper backing (holds the glue). Try the best you can to remove the top layer and then saturate the paper backing with the removal solution. This will ensure that you leave the wall smooth and undamaged while removing most of the adhesive.


Alternative Ideas

Professionals always recommend stripping wallpaper before painting, but if you must, you can paint over it.  If the wallpaper is in relatively good condition (little to no bubbling, peeling, etc.), painting over it will give your wall a fresh look with much less prep work.  Sometimes, removing wallpaper (especially if it is old) can do more damage to the wall than what is expected. This will require a little prep work, though.


Here are some common fixes:


  • Replace any damaged sections of the wallpaper.
  • Seal down loose edges with a clear coat of caulking.


Once you’ve made the necessary repairs, apply an oil-based primer before applying paint.  When you do paint, paint at least two coats for the best coverage.


If this all seems like more trouble than it’s worth, please give us at our Durango office at (970) 903-4305!  We have over 25 years’ experience with painting, paper hanging and paper removing and would be happy to do it for you!


Sources:

via, via, via, via, via

Tips for Painting the ODD Things Around Your Home

We all have those weird items around the inside and outside of our house.  You know the ones I am talking about – the floors, furniture or walls you have thought about painting but were not sure how to even begin.

Tips for painting ODD

Here on some tips for the things around the home that you have always wanted to paint, but had no idea you could paint!

Painting a Concrete Patio Floor

  1. First things first, clean off your patio. Use a scrub brush to get out all the dust from the nooks and crannies. Allow this to completely dry.
  2. Now, apply a primer. I know this step is not the most desirable but it will save you money in the long run. Primer usually is less expensive compared to using multiple layers of paint. Use a paint tray and a roller for best results.

Pro-tip: Pick an exterior paint with a primer already in it!

  1. Paint a layer of your color of choice! Allow to dry a few hours or up to a day.
  2. Now it is time to seal! You want your hours of manual labor to last, don’t you? Especially if the area you are painting gets a lot of foot traffic or has furniture on it, you are going to want he added layer of protection.

If you’re more of a visual learner, here is a video of the process!

Painting Your Uncoated Garage Floor

There is something so sleek about a painted garage floor.  It takes the industrial feel down a level.  Garage floors are tricky to paint though so this is easier said than done!  There are oil spills, paint spills, and who knows what else.

  1. So the first step probably comes as no surprise – you will want to be sure to get all of this cleaned up the best you can.
  2. The next step is to use a concrete cleaner and etching solution together in a plastic pump sprayer. Spray this on the floors and use a non-metal brush to scrub away! Do not allow this stuff to dry! Once you are done scrubbing, spray off the garage floor with a power washer or pressurized hose.
  3. Mop the floors to sop up excess water and speed up drying time.
  4. After the surface is completely dry, it is time to prep and paint!!

Again, if you are a visual learner, here is a step by step with pictures from Behr.

Painting Wicker Furniture

Like most painting projects, it is all in the prep work for these beauties.  Wicker furniture can be expensive and while it’s tempting to replace it, a coat of paint could really make them look brand new!

  1. Start with cleaning off you piece with a dry cloth or vacuum.
  2. Scrape off or power-wash (depending on the durability of your wicker) old paint
  3. Everyone’s favorite… PRIMER, PRIMER, and MORE PRIMER.
  4. If you couldn’t tell by the capitalization, this step is important! You will want to use an oil-based primer to save you on time and agitation.
  5. Painting… use an oil-based paint and determine if you need an indoor or outdoor paint. Outdoor paint is going to be more durable.

For more detailed instructions read: https://www.wickerwoman.com/articles/painting-wicker

Panting Wood Paneling

I know… shiplap and wood paneling are somehow trending again.  While I do not always understand it, if you already have it in your home, I can understand not wanting to replace it!  With a little elbow grease and paint, you can save yourself a lot of money!  Plus, the right paint colors always have a way of making your home look more modern.

  1. PREP, PREP, and more PREP! Are you seeing a pattern yet?
  2. Clean paneling, fill nail holes, caulk cracks, sand paneling, and sand trim!
  3. Now apply primer and paint!!
  4. Better Homes and Gardens gives a good demonstration if you need it!


If all of this seems too overwhelming, remember we would love to do it for you!  We are in Durango, Colorado and available by phone anytime at (970) 903-4305.

Refresh Your Space with These Quick Painting Projects

If you are one of the few of us left with extra energy after work, first of all, give me your secret!  Second, consider putting your energy to good use by refreshing the inside or outside of your home with some fresh paint.  Here are some ideas to get you started!

Add a POP color to a neutral room.

    1. This can be done by painting one wall, two walls, or every wall.  Our favorite is an accent wall.
    2. Incorporate stripes which is easily done with some masking tape.
    3. Polka dot walls are a playful touch as well and can be done using a stencil.
    4. Add a chalkboard wall!


There are so many different combinations you can do to spice up a room!  Stark white walls are plain so even if you’re not too bold with your colors, consider a creamy or off white to mix things up!

Paint in some details on your Outdoor Furniture/Front Door/Mailbox

    1. This will save you some time if your furniture does not need a complete painting makeover. If you are not an artist, don’t fret!  Stencils will help you out immensely.
painted wicker furniture
Source: Better Homes and Gardens


Paint Outdated Ceramic Tile for a Full makeover

    1. This can include the tile that is in the bathroom or the backsplash in the kitchen. You can paint a row of tile or paint all the tile. Here again, you can add a small design if you don’t mind the color of the ceramic tile.  Enamel craft paint will get this job done.
Source: Better Homes and Gardens

See here for a Better Homes and Gardens Tutorial.

Try these if you are daring!

    1. Painting the staircase/railing a vibrant color can go one of two ways. One: you can get the pop of color you are looking for or two: your house will start to look like the inside of a unicorn.  Here is a painted stair tutorial.
painted stairs
Source: http://beckertreppen.ru/wp-content/gallery/kenngott/kenngott004.jpg

Bonus Painting Projects

    1. Paint the fireplace
    2. Refresh your radiator.  BAM!  Your old decrepit radiator now looks brand new.
    3. Add some colors to your doors by painting the door knob.
    4. Repaint baseboards or trim.
    5. You can also repaint old pots in the front yard, back yard, or around the inside of the house.

The list goes on an on! You would be surprised what repainting does to a space/object.  If you have something a little too adventurous for yourself and want to enlist a professional, please call us at (970) 903-4305.  We can help you if you are in Durango, Bayfield, Ignacio, Cortez, Mancos or other nearby areas!

How to Protect Your Home from a Wildfire

Durango’s Lightner Creek Canyon Fire has been unsettling to say the least to most everyone.  With almost 400 acres burned and 170 homes evacuated so far, it’s not hard to see why.  Our prayers are with those who are evacuated.  Perhaps the most concerned people are homeowners here in Southwest Colorado as we are all currently under a red flag warning.  If you want to do your best to protect your home in the event of a forest fire, follow these pointers to mitigate the risk as much as possible.

Photo credit: Jerry McBride/Durango Herald

Clear Debris

Firefighters recommend a defensible area of at least 30 feet stretching out from your home.  Colorado state recommends at least 75 feet.  This includes not only brush, but any sort of dead vegetation, firewood stacks, leaves, pine needles or other debris on the roof or in gutters.  Prune tree branches within your defensible space so they are 10 feet above the ground.  Trim any branches that overhang your home – especially those near chimneys.  This won’t guarantee your home’s survival 100%, but it will increase the likelihood that firefighters will stick around to fight for your home.

Consider Fire Resistant Building Materials

For those of you who haven’t built your home or those who don’t mind making changes to their existing home, this is for you!  For your roofing materials, use: asphalt shingles, clay, tile or metal roofing.  For siding, consider using stone, brick or stucco.  For your windows, try double paned glass.  In the event of flying debris, it will prevent breakage, but also radiant heat that has been known to cause home furnishings to catch fire before fire ever enters the home.  If you haven’t built your home yet, consider using less windows on the side of your home that be more easily exposed to wildfire danger.

Sprinkler Systems and Smoke Detectors

Don’t discount the fact that a fire from your home could be the start of a forest fire.  It happened here in Durango!  Being that most of our homes are in rural areas, the response time of firefighters will likely take longer.  Properly installed and maintained smoke detectors are paramount!  Make sure they are clear of dust (dust decreases detectors sensitivity to smoke), that they are tested once a week and that they are installed up high (4 to 12 inches from the ceiling).

Sprinkler systems are even better at fighting fire in the event you’re not home or the fire is spreading too fast to be put out by a portable fire extinguisher.

Home Fire Prevention Strategies

While you may think it’s elementary, creating a fire evacuation plan and practicing with your family twice a year could save lives.  Colorado state forest service suggests marking two exits out of every room (including windows) and designating an area to meet outside the home so firefighters can be notified that everyone made it out of the home.  If you catch fire, remember the classic, “Stop, drop and roll.”

Regular Maintenance

If you want to be on the safe side, do a monthly check up of your home to be sure it’s protected.  Especially after storms when debris has been freed from trees.  Get your chimney cleaned once a year and clear weeds out near the home.  If you have decks or balconies, install a weed barrier to help keep weeds out from under your home.

If you need help preparing your home and replacing it with new siding, we are here for you anytime at (970) 903-4305.  We promise to take the guesswork out of your next residential or commercial paint or siding project!

How to Fix Faded Patio Furniture

how to fix faded patio furniture

Patio furniture is often a large investment so extending its life to get the maximum amount of years out of it is the way to go.  Or if you are a bargain shopper, you can find used patio furniture and polish it up to look new using these tips.

Aluminum Patio Furniture

Most patio furniture these days is made of aluminum and pretty pricey.  If you want to save yourself a few Benjamin’s, consider trying to fix sun fading with a little-known trick – automobile wax.  Yes, you read that right!  With a little elbow grease and an old rag, you can buff your furniture into almost new condition.

Faux Wicker Patio Furniture

If you are determined to keep your faux wicker furniture, you can extend its life a few years by trimming or completely removing damaged resin strips.  SF Gate says, “Paint or squeeze non-quick-set resin epoxy in the empty space where the new strip will be woven.”  Following the pattern of the furniture, start weaving new strip from the back of the furniture and end with strip through the back of the furniture.  You can use needle nose pliers to help with the process.  Use the epoxy to glue the loose ends down.  Allow ample time to dry (follow manufacturer directions for the epoxy) and enjoy like-new furniture!

Wood Patio Furniture

If you have wood furniture, you know they look good but require regular upkeep!  If you are unable to store your furniture out of the elements during the offseason, you may have some work in front of you.  First, be sure to clean them thoroughly.  Use a high-pressure hose attachment or a power washer to remove debris and old flaking finish.  Allow furniture to dry in a closed off environment such as a shed or garage to prevent debris from sticking to it.  Once furniture is dry, determine if the piece could use some sanding before applying new finish.  If so, be sure to use a tack cloth to remove sanding dust before applying finish.

Apply a new coat of exterior finish and allow ample time to dry.  A second coat is probably a good idea especially if you know your furniture will take a beating once fall and winter approach.

Teak Patio Furniture

Oh, this one is fun.  And by “fun”, I mean labor-intensive!  Begin by mixing a solution DIY Network suggests of two parts laundry detergent, one part bleach and one part water.  Use a scrub brush and work this solution into your teak furniture.  Hose down the furniture to remove all traces of dirt.

Because teak furniture tends to gray over time, you may decide to purchase a teak-specific cleaner to remove the discoloration.  You can also use sand paper to try and sand away the discoloration.  Once you’ve restored your furniture to your desired color, consider using a teak sealer to protect from further weathering.

Cover Your Furniture

If you want to save yourself some maintenance this time next year, store furniture in a shed or garage or simply cover it!  A thick sheet of canvas or covers made specifically for outdoor furniture will keep the elements from destroying it as quickly.

If you have questions or have a painting project we can help you with, we are here in Durango for you 24/7 at (970) 903-4305.  You won’t be disappointed!

Common Painting Mistakes You’re Probably Making

People assume painting is something anyone can do, but attempt a DIY paint project without knowing these common mistakes and you might find yourself wishing you never attempted doing it yourself!  As a professional painter of over 25 years, let me spare you some heartache.  Do not be ashamed if you have made these mistakes – they are all too common!


Common Painting Mistakes


Skimping on Prep Work

Oh man, this one is something I must fix all the time.  People fail to realize that a painting project is 75% and 25% actual painting.  So they often skip scraping, filling holes, sanding, taping, priming, covering, etc.  They think this will save them time and money, but what often happens is people destroy a piece of furniture they forgot to cover, or apply paint without primer so 6 months later it begins to flake off… you get the gist!

Using Flat Paint in Bathroom and Kitchen

I too have made this fatal error.  Bathrooms and kitchens are the higher traffic areas of our home.  The paint must hold up to steam from showers or high heat from ovens, etc.  Flat paint will show grease, water and heat damage more quickly than anything else.  Be sure to use semi-gloss or high-gloss paint!

Painting in Every Direction

Many people think that if the wall is covered with paint, the direction from which you approach the wall with your instrument does not matter.  Wrong, my friend!  Not only will you end up with an inconsistent-looking color, but your wall will almost look patchy.  Do yourself a favor and start by painting in an upward direction and coming back down in an “M” formation.  You do this so you slightly overlap your previous stroke.  You don’t want to roll down initially because this will cause roller drips, etc.

Painting a Second Coat Too Soon

Leave at least two hours for drying between coats.  You may think your paint is dry before, but trust us on this one!  Applying a second coat of paint before the first one is dry will undo all your hard work – resulting in painting pulling off and awful visible brush strokes.

Applying Too Much Paint

You may think you’re saving yourself time by applying thick paint on your walls, but that’s how you get globs of dry paint that looks like a poor texture job!  Use a paint screen if you are using a roller to help wipe off excess paint.  If using a brush, don’t dip it in too far.  Less than half of your brush should have paint on it.  You will save yourself a lot of paint and cleaning time this way!

Using Interior Paint on Your Home’s Exterior

You may think you will never make this mistake, but it’s easy to do.  Quite honestly, you can probably fix it by running another coat of the same color in the exterior color in most cases.  This is assuming the prep work was all done correctly and primed well.

If you need help repainting your home, we are here in Durango for you anytime at (970) 903-4305.  We promise to do a fantastic job and take any guesswork out of your next residential or commercial paint project!

Sources: DIY Network, Huffington Post

Best Time of Year to Repaint Your Home’s Exterior

I know Durango always comes with late snow surprises, but typically March is when we start to see less frequent snow, lots of mud and warmer temperatures.  So when the snow melts away and your home’s exterior looks a little discolored, you may get an itch to repaint.  I would never try to discourage a person from repainting, but let me offer you some professional tips to prevent you from having to repaint.

Repainting Home's Exterior

In an ideal world, one would only paint outdoors in only early summer or Fall, but Durango sees some pretty moderate temperatures in the Summer and rain is not usually too crazy.  With that being said, Spring, Summer, and Fall are fine for painting outdoors.  Our painters typically work with Sherwin William’s paint and all their exterior paints are low-temperature rated down to a surface temperature of 35 degrees.  As long as you’ve checked the forecast and it’s supposed to be warmer than 35 degrees for a 48 hour period, you should have the green light.

Another variable to watch out for is Spring rain.  Be sure to look at your forecast and leave a window of at least two hours of dry time before the rain comes.  Most latex paints take a few hours to dry.  If you’re looking for something to help you hedge your bets, Resilience paint has an early moisture cure process allowing it to dry faster than most latex paints (so it’s less likely to wash off with rain).

With summertime comes a better likelihood that the temperature will stay above 35 all day.  Although, Durango makes no promises!  My only real advice here is to do your best to avoid working in direct sunlight.  This will undoubtedly make the paint thicker and harder to work with.  It will of course dry faster and leave clumps of paint on the paint brush, too.  This will cause your paint to not spread as far and leave unsightly brush marks.

The best temperature range for painting outdoors with latex paint is from 50° to 85° F.  Avoid extreme temperatures, weather and excessive sunlight and you’ll be in the clear.  And as an added tip, be sure to follow proper procedure by scraping, sanding and priming your home’s siding before you paint.  If you need help repainting your home’s exterior, call us anytime at (970) 903-4305.  We promise to do a fantastic job and take any guesswork out of your next paint project!

Save

Save